HTML中的DOM樣式borderImage屬性是用於設置borderImageSource,borderImageSlice,borderImageWidth,borderImageOutset和borderImageRepeat屬性的簡寫屬性。
用法:
- 它用於返回borderImage屬性。
object.style.borderImage
- 它用於設置borderImage屬性。
object.style.borderImage = "source slice width outset repeat|
initial|inherit"
屬性值:在borderImage屬性中,有7個屬性值,如下所述:
- border-Image-Source:此參數保存將使用的源imgae。
- border-Image-Slice:此參數指定image-border的向內偏移。
- border-Image-Width:此參數保存使用的圖像邊框的寬度。
- border-Image-Outset:此參數定義應擴展的邊界區域。
- border-Image-Repeat:此參數定義邊框應重複,圓化或拉長。
- initial:此屬性值用於將此屬性設置為其默認值。
- inherit:此屬性值用於從其父元素繼承此屬性。
返回值:
它返回一個字符串值,該字符串值表示元素的border-image屬性。
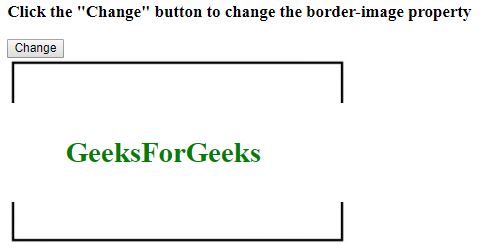
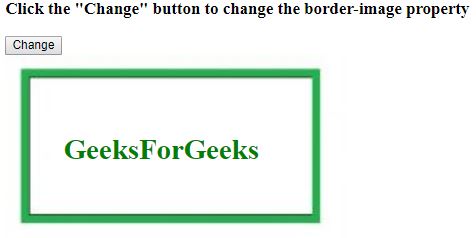
示例1:這顯示了如何更改border-image。
<!DOCTYPE html>
<html>

<head>
    <style>
        #my {
            border:50px solid transparent;
            width:250px;
            padding:15px 15px;

             <!-- Safari 5 -->
            -webkit-border-image:
url(https://media.geeksforgeeks.org/wp-content/uploads/bord-1-300x161.jpg)
              100 100 stretch;

             <!-- Opera 12 -->
            -o-border-image:
url(https://media.geeksforgeeks.org/wp-content/uploads/bord-1-300x161.jpg)
              100 100 stretch;

             border-image:
url(https://media.geeksforgeeks.org/wp-content/uploads/bord-1-300x161.jpg)
               100 100 stretch;
        }
    </style>
</head>

<body>

    <h3>Click the "Change" button to change the border-image property</h3>

    <button onclick="myFunction()">Change</button>

    <div id="my">
        <h1><font color="green">GeeksForGeeks</font></h1>
    </div>

    <script>
        function myFunction() {
              <!-- Code for Safari 5 -->
            document.getElementById("my").style.WebkitBorderImage =
"url(https://media.geeksforgeeks.org/wp-content/uploads/bord1-1-300x162.jpg)30 30 round";

             <!-- Code for Opera 12 -->
            document.getElementById("my").style.OBorderImage =
"url(https://media.geeksforgeeks.org/wp-content/uploads/bord1-1-300x162.jpg)30 30 round";

            document.getElementById("my").style.borderImage =
"url(https://media.geeksforgeeks.org/wp-content/uploads/bord1-1-300x162.jpg)30 30 round";
        }
    </script>

</body>

</html>
輸出:
之前單擊按鈕:
單擊按鈕後:“圖像的邊框已更改”

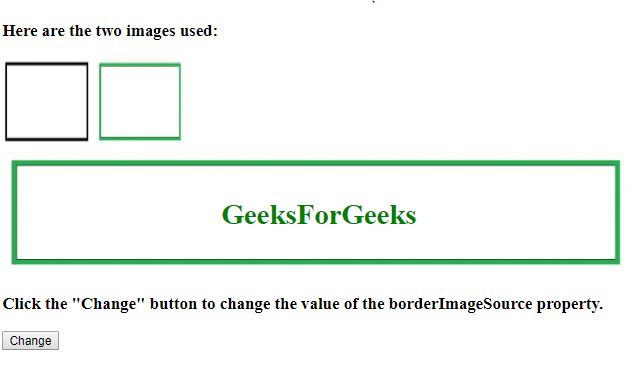
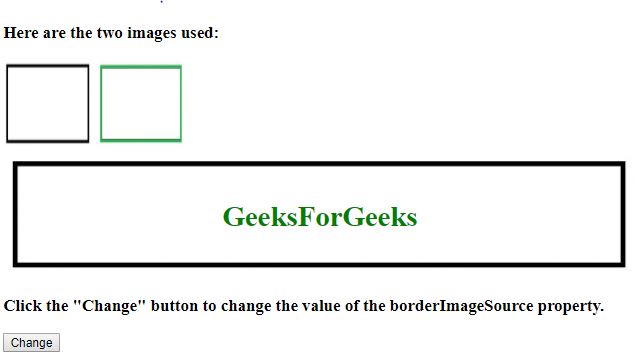
示例2:樣式borderImageSource屬性。
<!DOCTYPE html>
<html>

<head>
    <style>
        div {
            border:30px solid transparent;
            border-image:
              url(https://media.geeksforgeeks.org/wp-content/uploads/bord1-1-300x162.jpg);
            border-image-slice:30;
            border-image-width:1 1 1 1;
            border-image-outset:0;
            border-image-repeat:round;
        }
    </style>
</head>

<body>
    <h3>Here are the two images used:</h3>
    <img src=
"https://media.geeksforgeeks.org/wp-content/uploads/bord-1-300x161.jpg"
         height="100" width="100">

    <img src=
"https://media.geeksforgeeks.org/wp-content/uploads/bord1-1-300x162.jpg"
         height="100" width="100">

    <div id="main">
        <h1><center><font color="green" >
          GeeksForGeeks
         </font></center></h1>
    </div>

    <h3>Click the "Change" button to change the value of the borderImageSource property.</h3>

    <button onclick="myFunction()">Change</button>

    <script>
        function myFunction() {
            document.getElementById("main").style.borderImageSource =
              "url(https://media.geeksforgeeks.org/wp-content/uploads/bord-1-300x161.jpg)";
        }
    </script>
</body>

</html>
輸出:
之前單擊按鈕:

單擊按鈕後:

支持的瀏覽器:下麵列出了DOM Style borderImage屬性支持的瀏覽器:
- 穀歌瀏覽器1.0
- Internet Explorer 4.0
- Firefox 1.0
- Opera 3.5
- Safari 1.0
相關用法
- HTML Style top用法及代碼示例
- HTML Style right用法及代碼示例
- HTML Style borderImageWidth用法及代碼示例
- HTML Style backgroundPosition用法及代碼示例
- HTML Style borderLeftColor用法及代碼示例
- HTML Style resize用法及代碼示例
- HTML Style direction用法及代碼示例
- HTML Style background用法及代碼示例
- HTML Style borderImageRepeat用法及代碼示例
- HTML Style animationPlayState用法及代碼示例
- HTML Style tabSize用法及代碼示例
- HTML Style fontWeight用法及代碼示例
- HTML Style borderWidth用法及代碼示例
- HTML Style columnSpan用法及代碼示例
- HTML Style left用法及代碼示例
注:本文由純淨天空篩選整理自SHUBHAMSINGH10大神的英文原創作品 HTML | DOM Style borderImage Property。非經特殊聲明,原始代碼版權歸原作者所有,本譯文未經允許或授權,請勿轉載或複製。
