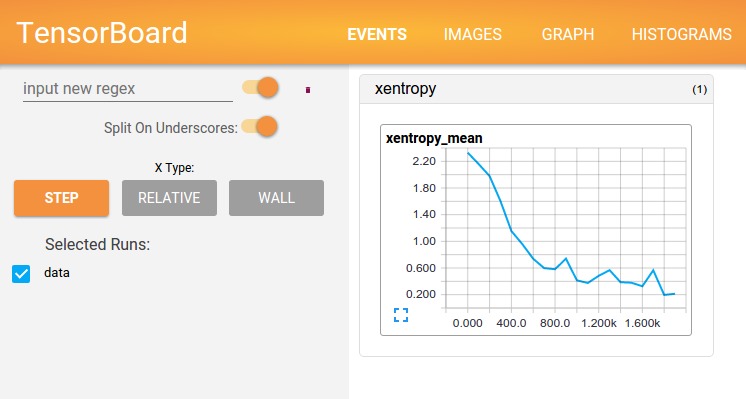
使用TensorFlow进行计算 – 如训练大量的深度神经网络 – 可能会很复杂且令人困惑。为了便于理解,调试和优化TensorFlow程序,我们引入了一套名为TensorBoard的可视化工具。您可以使用TensorBoard来显示您的TensorFlow图,绘制关于计算图执行的量化指标,并显示其他数据,如通过它的图像。当完全配置好TensorBoard时,看起来像这样:

本教程旨在让您开始使用简单的TensorBoard。也有不少其他Tensorboard的资源可用!如TensorBoard的GitHub就有关于TensorBoard使用情况的更多信息,包括提示&技巧和调试信息。
序列化数据
TensorBoard通过读取TensorFlow事件文件进行操作,事件文件包含运行TensorFlow时生成的摘要数据。以下是TensorBoard中汇总数据的一般生命周期:
首先,创建您想从中收集摘要数据的TensorFlow图,并决定要对哪个节点进行Summary操作注释。
例如,假设您正在训练用于识别MNIST数字的卷积神经网络,您想记录学习率随时间的变化,以及目标函数如何变化。通过附加tf.summary.scalar操作到输出学习率和损失的节点,收集这些信息。然后,给每个scalar_summary一个有意义的tag, 比如'learning rate'或'loss。
function'
也许你也想看到一个特定层的激活分布,或者梯度、权重的分布。通过附加tf.summary.histogram操作到梯度输出和保持你的权重的变量,来收集这些数据。
有关所有可用摘要操作的详细信息,请查看文档Summary操作。
在运行之前,TensorFlow中的操作不会执行任何操作。我们刚刚创建的摘要节点是计算图的外围设备:您当前正在运行的所有操作都不依赖于它们。所以,为了生成摘要,我们需要运行所有这些汇总节点。一个一个手动管理它们很麻烦,所以使用tf.summary.merge_all将它们组合成一个单独的操作来生成所有的汇总数据。
然后,您可以运行合并后的摘要操作,这将生成一个序列化Summaryprotobuf对象,它包含给定步骤中的所有摘要数据。最后,要将这个摘要数据写入磁盘,请将summary protobuf传递给一个tf.summary.FileWriter。
该FileWriter在它的构造函数中需要一个logdir – 这个logdir非常重要,它是所有事件将被写出的目录。另外,在FileWriter构造函数中可以选择一个Graph。如果它收到一个Graph对象,然后TensorBoard将可视化您的图形与张量形状信息。这会让你更好地理解图中流动的东西:见张量形状信息。
现在你已经修改了你的Graph,并有一个FileWriter,你准备好开始运行你的网络!如果你愿意,你可以每一个训练步都运行合并的摘要操作,并记录大量的训练数据。当然,通常是多步合并输出。
下面的代码示例是对简单的MNIST教程的修改,其中我们添加了一些Summary操作,并且每十步运行一次。如果你运行这个,然后启动tensorboard --logdir=/tmp/tensorflow/mnist,您将能够查看统计数据,例如在训练过程中权重或准确性如何变化。下面的代码是摘录;完整的来源是这里。
def variable_summaries(var):
  """Attach a lot of summaries to a Tensor (for TensorBoard visualization)."""
  with tf.name_scope('summaries'):
    mean = tf.reduce_mean(var)
    tf.summary.scalar('mean', mean)
    with tf.name_scope('stddev'):
      stddev = tf.sqrt(tf.reduce_mean(tf.square(var - mean)))
    tf.summary.scalar('stddev', stddev)
    tf.summary.scalar('max', tf.reduce_max(var))
    tf.summary.scalar('min', tf.reduce_min(var))
    tf.summary.histogram('histogram', var)

def nn_layer(input_tensor, input_dim, output_dim, layer_name, act=tf.nn.relu):
  """Reusable code for making a simple neural net layer.

  It does a matrix multiply, bias add, and then uses relu to nonlinearize.
  It also sets up name scoping so that the resultant graph is easy to read,
  and adds a number of summary ops.
  """
  # Adding a name scope ensures logical grouping of the layers in the graph.
  with tf.name_scope(layer_name):
    # This Variable will hold the state of the weights for the layer
    with tf.name_scope('weights'):
      weights = weight_variable([input_dim, output_dim])
      variable_summaries(weights)
    with tf.name_scope('biases'):
      biases = bias_variable([output_dim])
      variable_summaries(biases)
    with tf.name_scope('Wx_plus_b'):
      preactivate = tf.matmul(input_tensor, weights) + biases
      tf.summary.histogram('pre_activations', preactivate)
    activations = act(preactivate, name='activation')
    tf.summary.histogram('activations', activations)
    return activations

hidden1 = nn_layer(x, 784, 500, 'layer1')

with tf.name_scope('dropout'):
  keep_prob = tf.placeholder(tf.float32)
  tf.summary.scalar('dropout_keep_probability', keep_prob)
  dropped = tf.nn.dropout(hidden1, keep_prob)

# Do not apply softmax activation yet, see below.
y = nn_layer(dropped, 500, 10, 'layer2', act=tf.identity)

with tf.name_scope('cross_entropy'):
  # The raw formulation of cross-entropy,
  #
  # tf.reduce_mean(-tf.reduce_sum(y_ * tf.log(tf.softmax(y)),
  #                               reduction_indices=[1]))
  #
  # can be numerically unstable.
  #
  # So here we use tf.nn.softmax_cross_entropy_with_logits on the
  # raw outputs of the nn_layer above, and then average across
  # the batch.
  diff = tf.nn.softmax_cross_entropy_with_logits(targets=y_, logits=y)
  with tf.name_scope('total'):
    cross_entropy = tf.reduce_mean(diff)
tf.summary.scalar('cross_entropy', cross_entropy)

with tf.name_scope('train'):
  train_step = tf.train.AdamOptimizer(FLAGS.learning_rate).minimize(
      cross_entropy)

with tf.name_scope('accuracy'):
  with tf.name_scope('correct_prediction'):
    correct_prediction = tf.equal(tf.argmax(y, 1), tf.argmax(y_, 1))
  with tf.name_scope('accuracy'):
    accuracy = tf.reduce_mean(tf.cast(correct_prediction, tf.float32))
tf.summary.scalar('accuracy', accuracy)

# Merge all the summaries and write them out to /tmp/mnist_logs (by default)
merged = tf.summary.merge_all()
train_writer = tf.summary.FileWriter(FLAGS.summaries_dir + '/train',
                                      sess.graph)
test_writer = tf.summary.FileWriter(FLAGS.summaries_dir + '/test')
tf.global_variables_initializer().run()
初始化FileWriters之后,当我们训练和测试模型时,必须添加summary到FileWriters。
# Train the model, and also write summaries.
# Every 10th step, measure test-set accuracy, and write test summaries
# All other steps, run train_step on training data, & add training summaries

def feed_dict(train):
  """Make a TensorFlow feed_dict: maps data onto Tensor placeholders."""
  if train or FLAGS.fake_data:
    xs, ys = mnist.train.next_batch(100, fake_data=FLAGS.fake_data)
    k = FLAGS.dropout
  else:
    xs, ys = mnist.test.images, mnist.test.labels
    k = 1.0
  return {x: xs, y_: ys, keep_prob: k}

for i in range(FLAGS.max_steps):
  if i % 10 == 0:  # Record summaries and test-set accuracy
    summary, acc = sess.run([merged, accuracy], feed_dict=feed_dict(False))
    test_writer.add_summary(summary, i)
    print('Accuracy at step %s: %s' % (i, acc))
  else:  # Record train set summaries, and train
    summary, _ = sess.run([merged, train_step], feed_dict=feed_dict(True))
    train_writer.add_summary(summary, i)
您现在已经开始使用TensorBoard将这些数据可视化了。
启动TensorBoard
要运行TensorBoard,请使用以下命令(或者python -m)
tensorboard.main --logdir=path/to/log-directory
tensorboard --logdir=path/to/log-directory
其中logdir指向FileWriter序列化数据所在的目录。如果logdir目录包含来自单独运行的序列化数据的子目录,那么TensorBoard将可视化来自所有这些运行的数据。一旦TensorBoard正在运行,通过网页浏览器浏览地址localhost:6006即可查看TensorBoard。
特别需要注意的是:运行tensorboard时,可能遇到报错ImportError: cannot import name 'encodings', 详细错误信息如下:
Traceback (most recent call last):
  File "/usr/local/bin/tensorboard", line 7, in
    from tensorboard.main import main
  File "/usr/local/lib/python3.6/site-packages/tensorboard/main.py", line 30, in
    from tensorboard import default
  File "/usr/local/lib/python3.6/site-packages/tensorboard/default.py", line 35, in
    from tensorboard.plugins.audio import audio_plugin
  File "/usr/local/lib/python3.6/site-packages/tensorboard/plugins/audio/audio_plugin.py", line 27, in
    from tensorboard import plugin_util
  File "/usr/local/lib/python3.6/site-packages/tensorboard/plugin_util.py", line 21, in
    import bleach
  File "/usr/local/lib/python3.6/site-packages/bleach/__init__.py", line 14, in
    from html5lib.sanitizer import HTMLSanitizer
  File "/usr/local/lib/python3.6/site-packages/html5lib/sanitizer.py", line 7, in
    from .tokenizer import HTMLTokenizer
  File "/usr/local/lib/python3.6/site-packages/html5lib/tokenizer.py", line 17, in
    from .inputstream import HTMLInputStream
  File "/usr/local/lib/python3.6/site-packages/html5lib/inputstream.py", line 9, in
    from .constants import encodings, ReparseException
ImportError: cannot import name 'encodings'
解决这个问题的一种方法是:sudo pip install html5lib==1.0b8, 如果是python3, 将pip替换为pip3即可。
在使用TensorBoard时,您会看到右上角的导航标签。每个选项卡代表一组可以可视化的序列化数据。
关于使用graph选项卡可视化图的更深入信息,请参阅TensorBoard:图形可视化。
有关TensorBoard的更多其他资料,请参阅TensorBoard的GitHub。
