HTML DOM中的justifyContent樣式屬性用於在項目無法使用所有可用空間時將它們水平對齊。用於設置元素的位置。默認情況下,項目位於容器的開頭。
用法:
- 它返回justifyContent屬性。
object.style.justifyContent
- 它用來設置justifyContent屬性。
object.style.justifyContent = "flex-start|flex-end|center|
space-between|space-around|initial|inherit"
屬性值:
- flex-start:它用於從容器的開頭對齊彈性項目。
- flex-end:它用於在容器的末端對齊彈性項目。
- center:它將彈性項目對齊到容器的中心。
- space-between:伸縮項目以均勻的間距放置,在該位置將項目推到開始,最後一個項目推到結束。
- space-around:伸縮項目以彼此等角的間距放置。
- space-evenly:物品之間的間距相等,但與角的間距不同。
- initial:將根據默認值放置項目。
- inherit:這些項目將根據其繼承的父元素值放置。
返回值:它返回一個表示元素的justifyContent屬性的字符串。
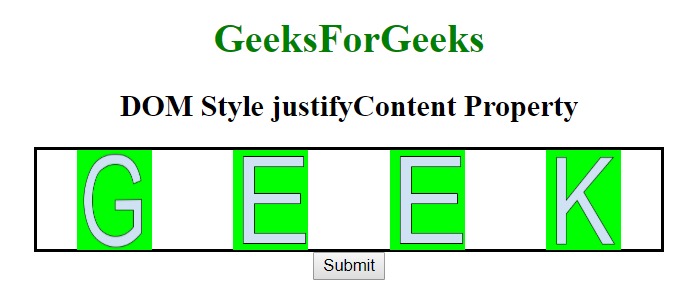
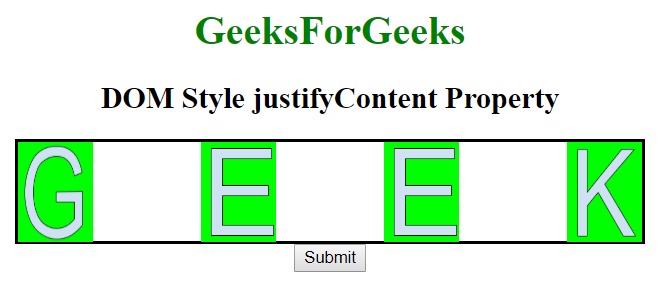
範例1:本示例描述space-between屬性值。
<!DOCTYPE html>
<html>

<head>
    <title>
        DOM Style justifyContent Property
    </title>

    <style>
        #GFG {
            width:500px;
            display:flex;
            height:80px;
            border:2px solid black;
            background-color:white;
            justify-content:space-around;
        }

        #GFG div {
            width:60px;
            height:80px;
        }
    </style>
</head>

<body>
    <center>
        <h1 style = "color:green;width:40%;">
            GeeksForGeeks
        </h1>

        <h2>DOM Style justifyContent Property </h2>

        <div id = "GFG">
            <div>
                <img src =
"https://media.geeksforgeeks.org/wp-content/uploads/g1-15.png"
                width = "60px" height = "80px">
            </div>

            <div>
                <img src =
"https://media.geeksforgeeks.org/wp-content/uploads/g2-14.png"
                width = "60px" height = "80px">
            </div>

            <div>
                <img src =
"https://media.geeksforgeeks.org/wp-content/uploads/g2-14.png"
                width = "60px" height = "80px">
            </div>

            <div>
                <img src =
"https://media.geeksforgeeks.org/wp-content/uploads/g3-10.png"
                width = "60px" height = "80px">
            </div>

        </div>

        <button type = "button" onclick = "geeks()">
            Submit
        </button>

        <!-- Style script used here -->
        <script>
            function geeks() {
            document.getElementById("GFG").style.justifyContent= "space-between";
            }
        </script>
    </center>
</body>

</html>
輸出:
之前單擊按鈕:

單擊按鈕後:

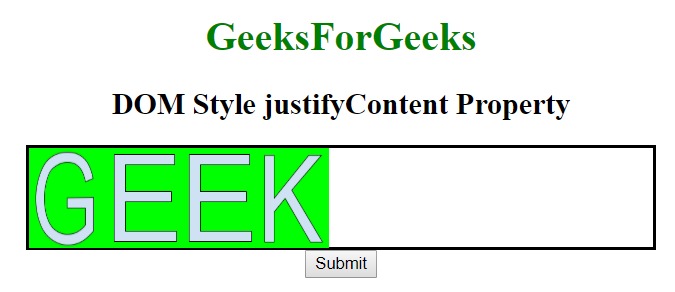
範例2:本示例描述flex-start屬性值。
<!DOCTYPE html>
<html>

<head>
    <title>
        DOM Style justifyContent Property
    </title>

    <style>
        #GFG {
            width:500px;
            display:flex;
            height:80px;
            border:2px solid black;
            background-color:white;
            justify-content:space-around;
        }

        #GFG div {
            width:60px;
            height:80px;
        }
    </style>
</head>

<body>
    <center>
        <h1 style = "color:green;width:40%;">
            GeeksForGeeks
        </h1>

        <h2>DOM Style justifyContent Property </h2>

        <div id = "GFG">
            <div>
                <img src =
"https://media.geeksforgeeks.org/wp-content/uploads/g1-15.png"
                width = "60px" height = "80px">
            </div>

            <div>
                <img src =
"https://media.geeksforgeeks.org/wp-content/uploads/g2-14.png"
                width = "60px" height = "80px">
            </div>

            <div>
                <img src =
"https://media.geeksforgeeks.org/wp-content/uploads/g2-14.png"
                width = "60px" height = "80px">
            </div>

            <div>
                <img src =
"https://media.geeksforgeeks.org/wp-content/uploads/g3-10.png"
                width = "60px" height = "80px">
            </div>

        </div>

        <button type = "button" onclick = "geeks()">
            Submit
        </button>

        <!-- Style script used here -->
        <script>
        function geeks() {
            document.getElementById("GFG").style.justifyContent= "flex-start";
        }
        </script>
    </center>
</body>

</html>
輸出:
之前單擊按鈕:

單擊按鈕後:

支持的瀏覽器:下麵列出了DOM Style justifyContent屬性支持的瀏覽器:
- 穀歌瀏覽器
- Internet Explorer 12.0
- Firefox
- Opera
相關用法
- HTML Style right用法及代碼示例
- HTML Style top用法及代碼示例
- HTML Style borderRight用法及代碼示例
- HTML Style textAlign用法及代碼示例
- HTML Style borderLeft用法及代碼示例
- HTML Style wordSpacing用法及代碼示例
- HTML Style textDecorationLine用法及代碼示例
- HTML Style opacity用法及代碼示例
- HTML Style height用法及代碼示例
- HTML Style whiteSpace用法及代碼示例
- HTML Style textDecoration用法及代碼示例
- HTML Style columnRuleStyle用法及代碼示例
- HTML Style display用法及代碼示例
- HTML Style transformStyle用法及代碼示例
- HTML Style visibility用法及代碼示例
注:本文由純淨天空篩選整理自bestharadhakrishna大神的英文原創作品 HTML | DOM Style justifyContent Property。非經特殊聲明,原始代碼版權歸原作者所有,本譯文未經允許或授權,請勿轉載或複製。
