CSS中的border-image属性用于设置元素的边框。
用法:
border-image:source slice width outset repeat|initial|inherit;
border-image属性是下面列出的许多属性的组合:
- border-image-source
- border-image-slice
- border-image-width
- border-image-outset
- border-image-repeat
属性值:
- border-image-source:此属性用于设置边框图像的源位置。
用法:border-image-source:url(image source location);
- border-image-slice:border-image-slice属性用于划分或切片由border-image-source属性指定的图像。
border-slice属性将给定图像划分为:- 9个地区
- 4个角
- 4条边
- 中部地区
用法:
border-image-slice:value;
- border-image-width:border-image-width属性用于设置边框的宽度。
用法:
border-image-width:value;
- border-image-outset:border-image-outset属性设置元素边框图像从其边框框中显示的距离。
用法:border-image-outset:value;
- border-image-repeat:border-image-repeat属性定义如何调整源图像的边区域以适合元素边框图像的尺寸。
用法:border-image-repeat:value;
- initial:它用于将border-image属性设置为其默认值。
- inherit:它用于从其父级设置border-image属性。
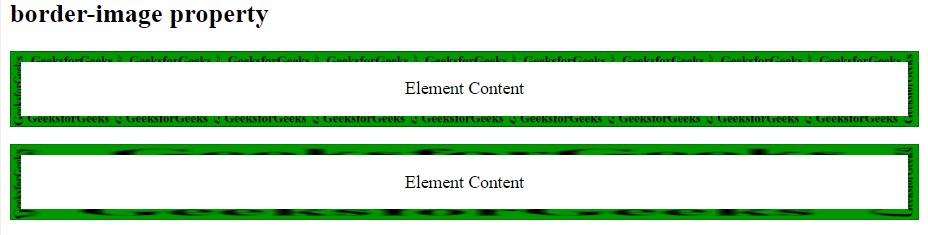
范例1:
<!DOCTYPE html>
<html>
    <head>
        <title>
            CSS border-image Property
        </title>

        <style>
            #borderimg1 {
                border:10px solid transparent;
                padding:15px;
                -webkit-border-image:url(
'https://media.geeksforgeeks.org/wp-content/uploads/border2-2.png')
                30 round;
                border-image:url(
'https://media.geeksforgeeks.org/wp-content/uploads/border2-2.png')
                30 round;
                text-align:center;
            }

            #borderimg2 {
                border:10px solid transparent;
                padding:15px;
                -webkit-border-image:url(
'https://media.geeksforgeeks.org/wp-content/uploads/border2-2.png')
                30 stretch;
                border-image:url(
'https://media.geeksforgeeks.org/wp-content/uploads/border2-2.png')
                30 stretch;
                text-align:center;
            }
        </style>
    </head>

    <body>
        <h2>border-image property</h2>

        <p id = "borderimg1">
            Element Content
        </p>
        <p id = "borderimg2">
            Element Content
        </p>
    </body>
</html>
输出:
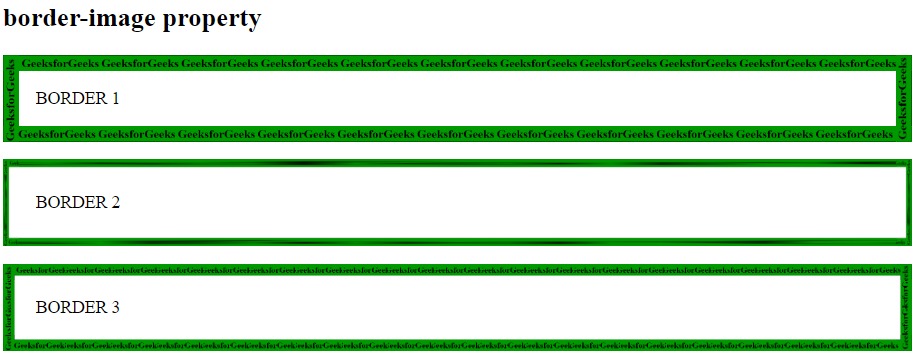
范例2:
<!DOCTYPE html>
<html>
    <head>
        <title>
            CSS border-image Property
        </title>

        <style>
            #borderimg1 {
                border:15px solid transparent;
                padding:15px;
                border-image:url(
'https://media.geeksforgeeks.org/wp-content/uploads/border2-2.png')
                50 round;
            }

            #borderimg2 {
                border:15px solid transparent;
                padding:15px;
                border-image:url(
'https://media.geeksforgeeks.org/wp-content/uploads/border2-2.png')
                40% stretch;
            }
            #borderimg3 {
                border:15px solid transparent;
                padding:15px;
                border-image:url(
'https://media.geeksforgeeks.org/wp-content/uploads/border2-2.png')
                70 round;
            }
        </style>
    </head>

    <body>
        <h2>border-image property</h2>
        <p id = "borderimg1">BORDER 1</p>
        <p id = "borderimg2">BORDER 2</p>
        <p id = "borderimg3">BORDER 3</p>
    </body>
</html>
输出:
支持的浏览器:下面列出了border-image属性支持的浏览器:
- Google Chrome 16.0、4.0 -webkit-
- Internet Explorer 11.0
- Firefox 15.0、3.5 -moz-
- Opera 15.0、11.0 -o-
- Safari 6.0、3.1 -webkit-
相关用法
- HTML Style borderImage用法及代码示例
- PHP Imagick borderImage()用法及代码示例
- PHP Gmagick borderImage()用法及代码示例
- CSS transition-property用法及代码示例
- CSS nav-right用法及代码示例
- CSS nav-down用法及代码示例
- CSS right属性用法及代码示例
- CSS nav-up用法及代码示例
- CSS all属性用法及代码示例
- CSS top属性用法及代码示例
- HTML DOM dir用法及代码示例
- HTML DOM id用法及代码示例
- CSS filter属性用法及代码示例
- CSS column-gap用法及代码示例
- CSS content属性用法及代码示例
注:本文由纯净天空筛选整理自apeksharustagi1998大神的英文原创作品 CSS | border-image Property。非经特殊声明,原始代码版权归原作者所有,本译文未经允许或授权,请勿转载或复制。