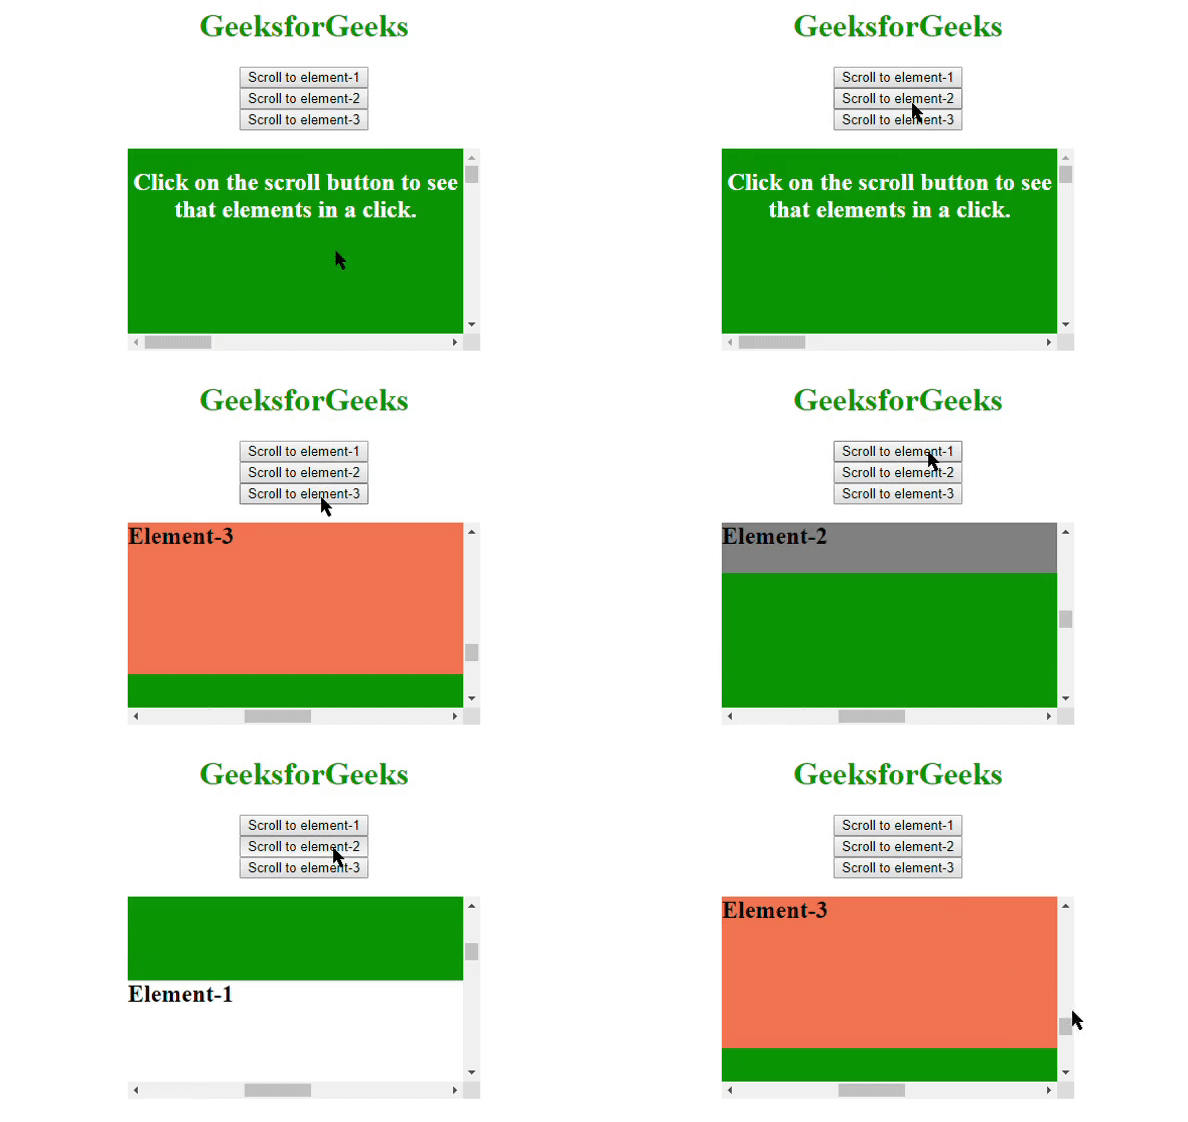
scrollIntoView()方法將指定的元素滾動到瀏覽器窗口的可見區域。
用法:
document.getElementById("id").scrollIntoView(alignTo);
參數:
- alignTo:它是一個布爾類型參數,包含true或false值。默認值設置為true。
- true:將元素滾動到其窗口頂部。
- false:將元素滾動到其窗口的底部。
請注意,基本術語不是“頂部”或“底部”,我將在下一部分中進行介紹。
因此,就像在按鈕上分配了特定窗口坐標或元素的鼠標懸停在各個窗口中的元素上一樣。
例:
<!DOCTYPE html>
<html>

<head>
    <style>
        #element {
            height:200px;
            width:350px;
            overflow:auto;
            background:green;
        }

        #content1 {
            margin:500px;
            height:100px;
            width:1000px;
            background-color:white;
        }

        #content2 {
            margin:500px;
            height:50px;
            width:1000px;
            background-color:grey;
        }

        #content3 {
            margin:500px;
            height:150px;
            width:1000px;
            background-color:coral;
        }
    </style>
    <script>
        function myFunction1() {
            var e = document.getElementById("content1");
            e.scrollIntoView(false); // Makes the element
        }

        function myFunction2() {
            var e = document.getElementById("content2");
            e.scrollIntoView(true);
        }

        function myFunction3() {
            var e = document.getElementById("content3");
            e.scrollIntoView(); // Default is true
        }
    </script>
</head>

<body>
    <center>
        <h1 style="color:green">GeeksforGeeks</h1>
        <button onclick="myFunction1()">Scroll to element-1</button>
        <br>
        <button onclick="myFunction2()">Scroll to element-2</button>
        <br>
        <button onclick="myFunction3()">Scroll to element-3</button>
        <br>
        <br>

        <div id="element">
            <h2 style="color:white">
              Click on the scroll button to see
              that elements in a click.</h2>
            <div id="content1">
                <h2 align="left">Element-1</h2>
            </div>
            <div id="content2">
                <h2 align="left">Element-2</h2>
            </div>
            <div id="content3">
                <h2 align="left">Element-3</h2>
            </div>
        </div>
    </center>
</body>

</html>
輸出:

因此,在上麵,項目之間的轉換不是很順暢,隻是元素之間的跳躍。
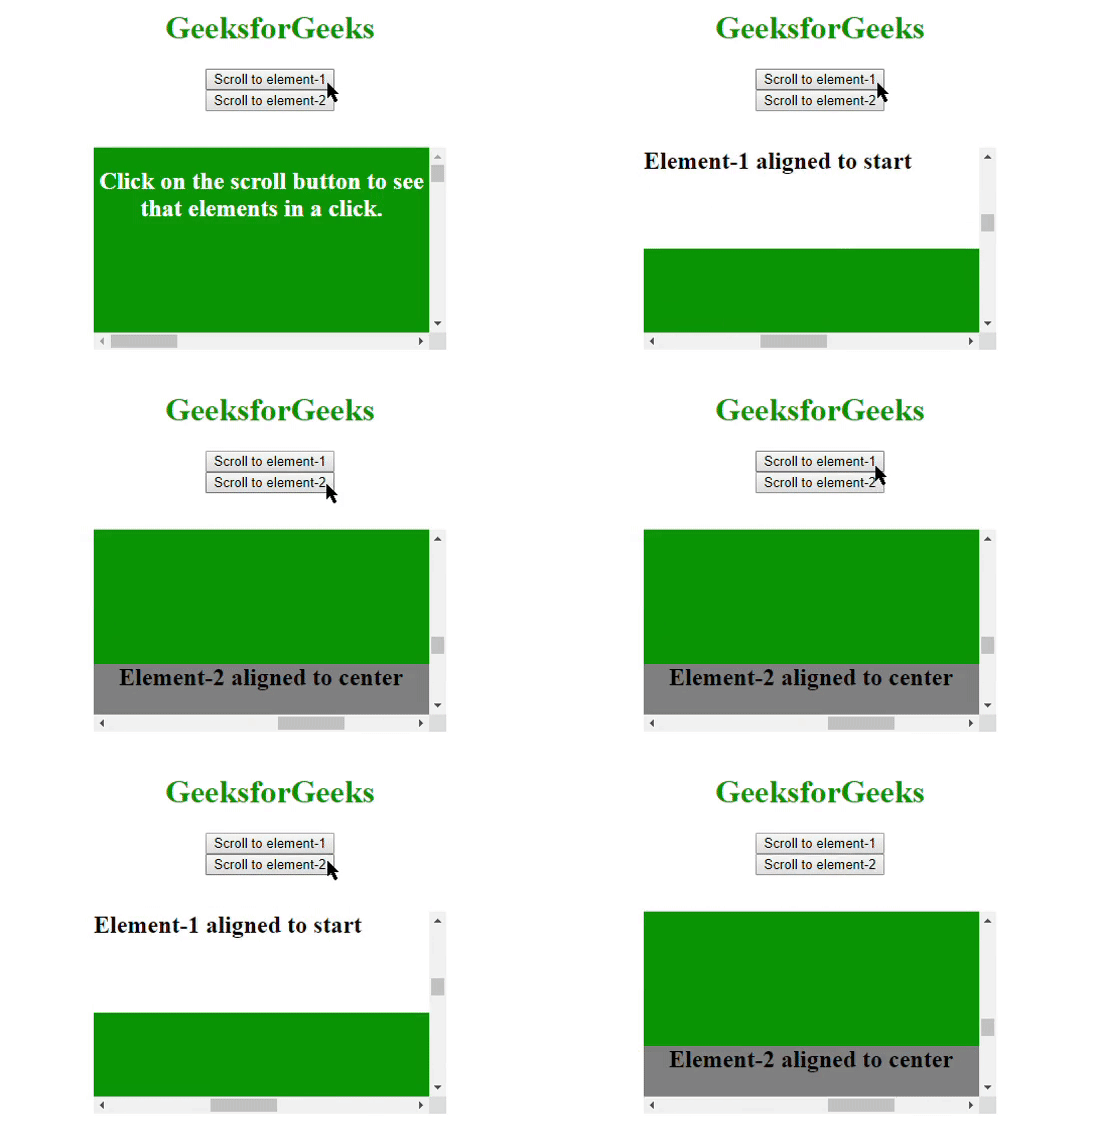
為了使它看起來很酷,為此使用了對象參數。
用法:
document.getElementById("id").scrollIntoView({
  behavior:smooth | auto;
  block:start | center | end | nearest;
  inline:start | center | end | nearest;
});
行為對象確定滾動的平滑度有兩種模式:“平滑”和“自動”。塊對象確定元素視圖應從塊的哪一部分開始。內聯對象確定視圖應從元素的哪個對齊開始。
例:
<!DOCTYPE html>
<html>

<head>
    <style>
        #element {
            height:200px;
            width:350px;
            overflow:auto;
            background:green;
        }

        #content1 {
            margin:500px;
            height:100px;
            width:1000px;
            background-color:white;
        }

        #content2 {
            margin:500px;
            height:50px;
            width:1000px;
            background-color:grey;
        }
    </style>
    <script>
        function myFunction1() {
            var e = document.getElementById("content1");
            e.scrollIntoView({
                block:'start',
                behavior:'smooth',
                inline:'start'
            });
        }

        function myFunction2() {
            var e = document.getElementById("content2");

            // Ends the block to the window
            // Bottom and aligns the view to the center
            e.scrollIntoView({
                block:'end',
                behavior:'smooth',
                inline:'center'
            });
        }
    </script>
</head>

<body>
    <center>
        <h1 style="color:green">GeeksforGeeks</h1>
        <button onclick="myFunction1()">
          Scroll to element-1
      </button>
        <br>
        <button onclick="myFunction2()">
          Scroll to element-2
      </button>
        <br>
        <br>
        <br>

        <div id="element">
            <h2 style="color:white">
              Click on the scroll button to
              see that elements in a click.
          </h2>
            <div id="content1">
                <h2 align="left">Element-1 aligned to start</h2>
            </div>
            <div id="content2">
                <h2>Element-2 aligned to center</h2>
            </div>
        </div>
    </center>
</body>

</html>
輸出:

相關用法
- HTML DOM contains()用法及代碼示例
- HTML DOM getBoundingClientRect()用法及代碼示例
- HTML DOM requestFullscreen()用法及代碼示例
- HTML DOM execCommand()用法及代碼示例
- HTML DOM removeNamedItem()用法及代碼示例
- HTML DOM item()用法及代碼示例
- HTML DOM createDocumentFragment()用法及代碼示例
- HTML DOM removeEventListener()用法及代碼示例
- HTML DOM replaceChild()用法及代碼示例
- HTML DOM renameNode()用法及代碼示例
- HTML DOM hasAttributes()用法及代碼示例
- HTML DOM removeChild()用法及代碼示例
- HTML DOM compareDocumentPosition()用法及代碼示例
- HTML DOM focus()用法及代碼示例
- HTML DOM hasChildNodes()用法及代碼示例
注:本文由純淨天空篩選整理自Tejashwi5大神的英文原創作品 HTML | DOM scrollIntoView() Method。非經特殊聲明,原始代碼版權歸原作者所有,本譯文未經允許或授權,請勿轉載或複製。
