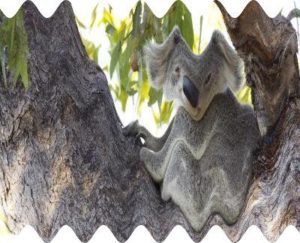
wave()函数从图像的顶部和底部创建波形结构。在图像内产生波纹效果。我们可以使用wave()函数中的幅度和wave_length参数来更改图像的波长和幅度。
用法:
wand.image.wave(amplitude, wave_legth)
参数:
| 参数 | 输入类型 | 描述 |
|---|---|---|
| amplitude | numbers.Integer | 设置波幅。 |
| wavelength | numbers.Integer | 设置波的波长。 |
源图像:

范例1:
# Import Image from wand.image module
from wand.image import Image

# Read image using Image function
with Image(filename ="koala.jpeg") as img:

    # rippled image using vignette() function
    img.wave(amplitude = img.height / 32,
             wave_length = img.width / 4)
    img.save(filename ="wkoala2.jpeg")
输出:

范例2:增加幅度并减少波长。
# Import Image from wand.image module
from wand.image import Image

# Read image using Image function
with Image(filename ="koala.jpeg") as img:

    # rippled image using vignette() function
    img.wave(amplitude = img.height / 24,
             wave_length = img.width / 8)
    img.save(filename ="wkoala2.jpeg")
输出:

相关用法
- Python Wand wave()用法及代码示例
- Python Pgmagick wave()用法及代码示例
- Python Wand function()用法及代码示例
- Python Wand gaussian_blur()用法及代码示例
- Python Wand transform()用法及代码示例
- Python Wand crop()用法及代码示例
- Python Wand rotational_blur()用法及代码示例
- Python Wand Image()用法及代码示例
- Python Wand shade()用法及代码示例
- Python Wand sharpen()用法及代码示例
- Python Wand adaptive_sharpen()用法及代码示例
- Python Wand noise()用法及代码示例
- Python Wand blue_shift()用法及代码示例
- Python Wand color_matrix()用法及代码示例
- Python Wand unsharp_mask()用法及代码示例
注:本文由纯净天空筛选整理自RahulSabharwal大神的英文原创作品 Wand wave() function in Python。非经特殊声明,原始代码版权归原作者所有,本译文未经允许或授权,请勿转载或复制。
