在本文中,我们将实现Python OpenCV - BFMatcher() 函数。
先决条件:OpenCV、matplotlib
BFMatcher() 函数是什么?
BFMatcher()函数用于特征匹配,用于将一幅图像中的特征与另一幅图像进行匹配。 BFMatcher 指的是一个强力匹配器,它什么都不是,而是用于将第一组中的一个特征的说明符与第二组中的每个其他特征进行匹配的距离计算。然后返回最近的。对于第一组中的每个说明符,该匹配器通过尝试每个说明符来找到第二组中最接近的说明符。该说明符匹配器支持屏蔽说明符集的允许匹配。因此,为了实现该函数,我们的目标是找到一幅图像的特征集与另一幅图像的特征集最接近的说明符。
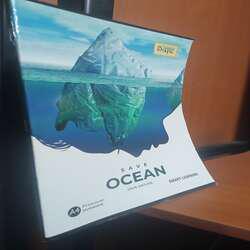
输入图像示例:

图片1
图片2
安装所需模块:
要安装必备模块,请在命令提示符或终端中运行以下命令。
pip install opencv-python==3.4.2.16
pip install opencv-contrib-python==3.4.2.16
pip install matplotlib
代码实现:
Python
# Importing required modules
import cv2
import matplotlib.pyplot as plt
# reading images
img1 = cv2.imread("image1.jpg")
img2 = cv2.imread("image2.jpg")
# function for feature matching
def BFMatching(img1, img2):
# Initiate SIFT detector
feat = cv2.ORB_create(5)
# find the keypoints and descriptors with SIFT
kpnt1, des1 = feat.detectAndCompute(img1, None)
kpnt2, des2 = feat.detectAndCompute(img2, None)
# BFMatcher with default parameters
bf = cv2.BFMatcher()
# finding matches from BFMatcher()
matches = bf.knnMatch(des1, des2, k=2)
# Apply ratio test
good = []
matched_image = cv2.drawMatchesKnn(img1,
kpnt1, img2, kpnt2, matches, None,
matchColor=(0, 255, 0), matchesMask=None,
singlePointColor=(255, 0, 0), flags=0)
# creating a criteria for the good matches
# and appending good matchings in good[]
for m, n in matches:
# print("m.distance is <",m.distance,">
# 1.001*n.distance is <",0.98*n.distance,">")
if m.distance < 0.98 * n.distance:
good.append([m])
# for jupyter notebook use this function
# to see output image
# plt.imshow(matched_image)
# if you are using python then run this-
cv2.imshow("matches", matched_image)
cv2.waitKey(0)
# uncomment the below section if you want to see
# the key points that are being used by the above program
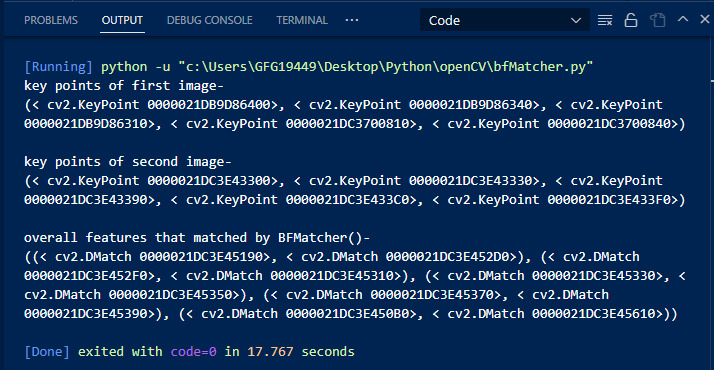
print("key points of first image- ")
print(kpnt1)
print("\nkey points of second image-")
print(kpnt2)
print("\noverall features that matched by BFMatcher()-")
print(matches)
return("good features", good) # returning ggod features
BFMatching(img1, img2) 解释:
- 在第 3 行和第 4 行中,我们将两张图像作为输入。
- BFMatching方法:
- 我们创建了我们的筛检测器“壮举”我们将计算输入图像的关键点。在这里,我们通过将参数 5 赋予 cv2.ORB_create() 方法,创建了用于从每个图像中检测 5 个关键点的检测器。
- 然后我们初始化了我们的BFMatcher()具有默认参数的函数。
- df.knnMatch()方法将找到所有匹配并将它们存储在 matches 数组中。
- 然后drawMathchesKnn()方法将绘制由创建的匹配BFMatcher()
- 接下来的循环是根据我们的兴趣或标准选择良好的匹配,在此示例中,我们假设如果图像 1 的匹配特征的距离大于 0.98 X(图像 1 的相应特征的距离),则该特征将是良好的。第二张图片)并将它们存储到数组 good[] 中。
您可以看到输出。在下面的输出中,总体匹配为 5。符合我们逻辑的良好特征是否为 4。
输出:
我们将看到程序绘制或显示的输出图像:
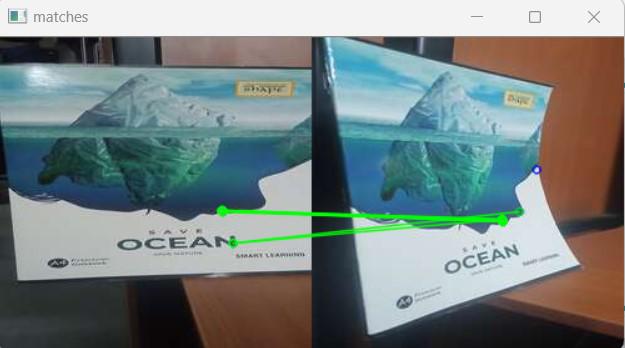
输出
相关用法
- Python OpenCV cv2.circle()用法及代码示例
- Python OpenCV cv2.blur()用法及代码示例
- Python OpenCV cv2.ellipse()用法及代码示例
- Python OpenCV cv2.cvtColor()用法及代码示例
- Python OpenCV cv2.copyMakeBorder()用法及代码示例
- Python OpenCV cv2.imread()用法及代码示例
- Python OpenCV cv2.imshow()用法及代码示例
- Python OpenCV cv2.imwrite()用法及代码示例
- Python OpenCV cv2.putText()用法及代码示例
- Python OpenCV cv2.rectangle()用法及代码示例
- Python OpenCV cv2.arrowedLine()用法及代码示例
- Python OpenCV cv2.erode()用法及代码示例
- Python OpenCV cv2.line()用法及代码示例
- Python OpenCV cv2.flip()用法及代码示例
- Python OpenCV cv2.transpose()用法及代码示例
- Python OpenCV cv2.rotate()用法及代码示例
- Python OpenCV cv2.polylines()用法及代码示例
- Python OpenCV Canny()用法及代码示例
- Python OpenCV destroyAllWindows()用法及代码示例
- Python OpenCV Filter2D()用法及代码示例
- Python OpenCV getgaussiankernel()用法及代码示例
- Python OpenCV getRotationMatrix2D()用法及代码示例
- Python OpenCV getTrackbarPos()用法及代码示例
- Python OpenCV haveImageReader()用法及代码示例
- Python OpenCV imdecode()用法及代码示例
注:本文由纯净天空筛选整理自anujmishraa大神的英文原创作品 Python OpenCV – BFMatcher() Function。非经特殊声明,原始代码版权归原作者所有,本译文未经允许或授权,请勿转载或复制。