Mongoose Schema API pre() 方法用于向 mongoose Schema 方法添加 pre-hook,可用于执行 pre Schema 方法操作。
用法:
Schema.prototype.pre(methodName, options, callback)
参数:它接受如上所述和如下所述的以下参数:
- methodName:它表示 Schema 方法名称的名称,或者方法名称的正则表达式,以将预中间件应用到
- options:它是一个可选的 mongoose 对象,包含options.document和options.query.
- callback:它是一个回调函数,接受参数 next。
返回类型:它返回一个 Schema 对象作为响应。
创建节点应用程序并安装 Mongoose:
步骤1:使用以下命令创建节点应用程序:
mkdir folder_name
cd folder_name
npm init -y
touch main.js
步骤 2:完成 Node.js 应用程序后,使用以下命令安装所需的模块:
npm install mongoose
示例 1:在此示例中,我们将使用此方法来记录应用于 mongoose 查询的过滤器。
文件名:main.js
Javascript
// Importing the module
const mongoose = require('mongoose')
// Creating the connection
mongoose.connect('mongodb://localhost:27017/query-helpers',
{
dbName: 'event_db',
useNewUrlParser: true,
useUnifiedTopology: true
}, err => err ? console.log(err)
: console.log('Connected to database'));
const personSchema = new mongoose.Schema({
name: {
type: String,
},
age: {
type: Number,
}
});
personSchema.pre(/^find/, function (next) {
console.log(this.getFilter());
});
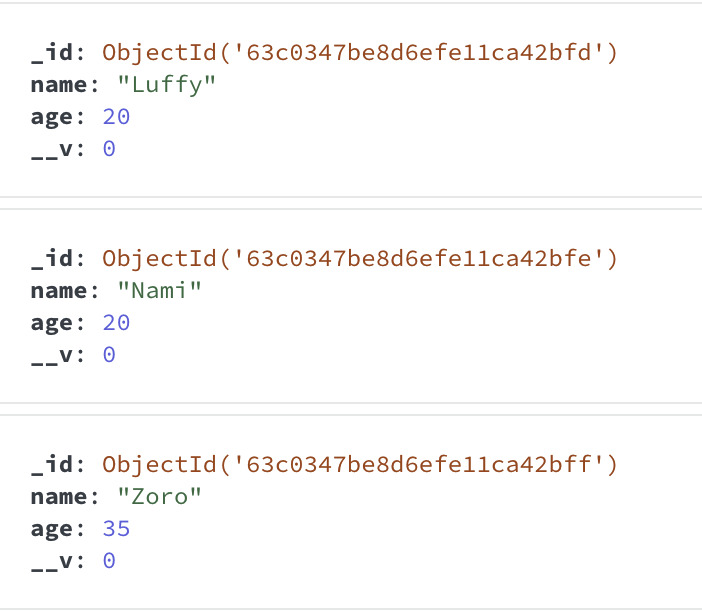
const personsArray = [
{
name: 'Luffy',
age: 20
},
{
name: 'Nami',
age: 20,
},
{
name: 'Zoro',
age: 35
}
]
const Person = mongoose.model('Person', personSchema);
(async () => {
await Person.insertMany(personsArray)
await Person.find({ name: "Luffy", age: 20 })
})()运行应用程序的步骤:从项目的根目录使用以下命令运行应用程序:
node main.js
输出:

使用 MongoDB 指南针的数据库的 GUI 表示:
示例 2:在此示例中,我们将使用此方法来更新 mongoose 文档的名称,然后将其保存到 MongoDB
文件名:main.js
Javascript
// Importing the module
const mongoose = require('mongoose')
// Creating the connection
mongoose.connect('mongodb://localhost:27017/query-helpers',
{
dbName: 'event_db',
useNewUrlParser: true,
useUnifiedTopology: true
}, err => err ? console.log(err)
: console.log('Connected to database'));
const personSchema = new mongoose.Schema({
name: {
type: String,
},
age: {
type: Number,
}
});
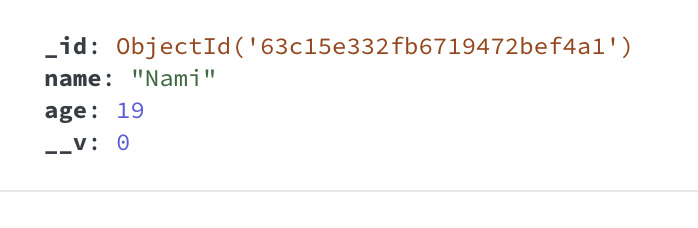
personSchema.pre('save', function (next) {
if (this.name === 'Luffy') {
this.name = 'Nami'
}
next()
});
const Person = mongoose.model('Person', personSchema);
(async () => {
const person = new Person({ name: 'Luffy', age: '19' })
await person.save()
})()运行应用程序的步骤:从项目的根目录使用以下命令运行应用程序:
node main.js
使用 MongoDB 指南针的数据库的 GUI 表示:
参考: https://mongoosejs.com/docs/api/schema.html#schema_Schema-pre
相关用法
- Mongoose Schema.prototype.plugin()用法及代码示例
- Mongoose Schema.prototype.virtual()用法及代码示例
- Mongoose Schema.prototype.static()用法及代码示例
- Mongoose SchemaType.prototype.ref()用法及代码示例
- Mongoose SchemaType.prototype.default()用法及代码示例
- Mongoose SchemaType.prototype.immutable()用法及代码示例
- Mongoose SchemaType.prototype.unique()用法及代码示例
- Mongoose Schema Connection.prototype.asPromise()用法及代码示例
- Mongoose SchemaType.prototype.validate()用法及代码示例
- Mongoose Schema Connection.prototype.dropCollection()用法及代码示例
- Mongoose SchemaType.prototype.get()用法及代码示例
- Mongoose Schema Connection.prototype.set()用法及代码示例
- Mongoose SchemaType.prototype.text()用法及代码示例
- Mongoose SchemaType.prototype.set()用法及代码示例
- Mongoose SchemaType.prototype.required()用法及代码示例
- Mongoose SchemaType.prototype.select()用法及代码示例
- Mongoose Schema Connection.prototype.dropDatabase()用法及代码示例
- Mongoose SchemaType.prototype.transform()用法及代码示例
- Mongoose SchemaType.prototype.index()用法及代码示例
- Mongoose Schema Connection.prototype.close()用法及代码示例
- Mongoose Schema Connection.prototype.useDb()用法及代码示例
- Mongoose countDocuments()用法及代码示例
- Mongoose deleteMany()用法及代码示例
- Mongoose deleteOne()用法及代码示例
- Mongoose estimatedDocumentCount()用法及代码示例
注:本文由纯净天空筛选整理自dishebhbhayana大神的英文原创作品 Mongoose Schema.prototype.pre() API。非经特殊声明,原始代码版权归原作者所有,本译文未经允许或授权,请勿转载或复制。