有时,作为设计师,您想取悦用户,为此,您决定向高级用户提供高级内容,但要使其与众不同可能是一项艰巨的挑战。 amp-access标签是专门为这样做而设计的。它可以为logged-in用户,高级会员和未登录用户设置控件。通过使用此标记,可以将对身份验证和授权的支持添加到web-pages。
设置:
首先,将amp-access组件与amp-analytics一起导入。
HTML
<!-- amp-access component -->
<script async custom-element="amp-access" src=
    "https://cdn.ampproject.org/v0/amp-access-0.1.js">
</script>

<!-- amp-analytics component -->
<script async custom-element="amp-analytics" src=
    "https://cdn.ampproject.org/v0/amp-analytics-0.1.js">
</script>
现在,要添加登录页面和注销页面信息,请使用以下代码。您必须提供登录点,一个用于登录,另一个用于唱歌。
HTML
<script id="amp-access" type="application/json">
 {
     "authorization":"geeksforgeeks.org",
     "pingback":"geeksforgeeks.org",
     "login":{
       "sign-in":"geeksforgeeks.org",
       "sign-out":"geeksforgeeks.org"
     },
     "authorizationFallbackResponse":{
         "error":true,
         "loggedIn":false,
         "powerUser":false
     }
 }
</script>
您必须使用上面代码中提到的相同ID,并且可以根据需要更改URL。
控制可见性:用户只能看到该用户应具有的作用,这一点非常重要,即,如果该用户是高级会员,则该用户应获得高级特权;如果未登录,则应向其显示log-in选项,等等。因此,请使用以下代码:
- 显示对网站的所有访问者可见的部分。
HTML
<section>
    Welcome to GeeksForGeeks!
</section>- 要显示logged-in用户的内容,我们将使用amp-access属性并控制部门的可见性。
HTML
<section amp-access="loggedIn">
    This section is only visible if
    you're logged in. Welcome back
    to GeeksForGeeks!
</section>- 现在,如果用户既是高级会员又登录,那么他的代码如下:
HTML
<section amp-access="loggedIn AND powerUser">
    This section is only visible if you're
    logged in <em>and</em> classified as
    "premium user of GeeksForGeeks".
</section>- 如果用户已注销,那么应该显示一条正确的消息,因此:
HTML
<section amp-access="NOT loggedIn">
    This section is only visible
    if you're not logged in.
</section>
Log-in和Log-out按钮:登录按钮用于使用某些凭据将log-in传送到门户,登录后,您可以看到logged-in的内容。对于登录按钮,请使用以下代码:
HTML
<button amp-access="NOT loggedIn" amp-access-hide
 on="tap:amp-access.login-sign-in">
    Please Login
</button>
另一方面,注销可以使您退出系统。要添加注销按钮,请使用以下代码:
HTML
<button amp-access="loggedIn" amp-access-hide
 on="tap:amp-access.login-sign-out">
    Logout
</button>
例:
HTML
<!doctype html>
<html amp>

<head>
    <meta charset="utf-8">
    <title>Google AMP amp-access</title>

    <script async src=
        "https://cdn.ampproject.org/v0.js">
    </script>

    <!-- Import the `amp-access` component
        in the header. -->
    <script async custom-element="amp-access"
src="https://cdn.ampproject.org/v0/amp-access-0.1.js">
    </script>

    <!-- `amp-access` requires `amp-analytics`
        to be imported as well. -->
    <script async custom-element="amp-analytics"
src="https://cdn.ampproject.org/v0/amp-analytics-0.1.js">
    </script>

    <script async custom-template="amp-mustache"
src="https://cdn.ampproject.org/v0/amp-mustache-0.2.js">
    </script>

    <script id="amp-access" type="application/json">
    {
        "authorization":"geeksforgeeks.org",
        "pingback":"geeksforgeeks.org",
        "login":{
            "sign-in":"geeksforgeeks.org",
            "sign-out":"geeksforgeeks.org"
        },
        "authorizationFallbackResponse":{
            "error":true,
            "loggedIn":false,
            "powerUser":false
        }
    }
    </script>

    <link rel="canonical" href=
"https://amp.dev/documentation/examples/components/amp-access/index.html">

    <meta name="viewport" content=
"width=device-width,minimum-scale=1,initial-scale=1">

    <style amp-boilerplate>
        body {
            -webkit-animation:-amp-start 8s
                steps(1, end) 0s 1 normal both;

            -moz-animation:-amp-start 8s
                steps(1, end) 0s 1 normal both;

            -ms-animation:-amp-start 8s
                steps(1, end) 0s 1 normal both;

            animation:-amp-start 8s
                steps(1, end) 0s 1 normal both;
        }

        @-webkit-keyframes -amp-start {
            from {
                visibility:hidden
            }

            to {
                visibility:visible
            }
        }

        @-moz-keyframes -amp-start {
            from {
                visibility:hidden
            }

            to {
                visibility:visible
            }
        }

        @-ms-keyframes -amp-start {
            from {
                visibility:hidden
            }

            to {
                visibility:visible
            }
        }

        @-o-keyframes -amp-start {
            from {
                visibility:hidden
            }

            to {
                visibility:visible
            }
        }

        @keyframes -amp-start {
            from {
                visibility:hidden
            }

            to {
                visibility:visible
            }
        }
    </style>

    <noscript>
        <style amp-boilerplate>
            body {
                -webkit-animation:none;
                -moz-animation:none;
                -ms-animation:none;
                animation:none
            }
        </style>
    </noscript>

    <style amp-custom>
        h1 {
            color:green;
            text-align:center;
        }

        section {
            color:crimson;
        }
    </style>
</head>

<body>
    <h1>
        Geeks For Geeks
    </h1>

    <section>
        Welcome to GeeksForGeeks!
    </section>

    <section amp-access="loggedIn">
        This section is only visible if
        you're logged in. Welcome back
        to GeeksForGeeks!
    </section>

    <section amp-access="loggedIn AND powerUser">
        This section is only visible if you're
        logged in <b>and</b> classified as
        "premium user of GeeksForGeeks".
    </section>

    <section amp-access="NOT loggedIn">
        This section is only visible if
        you're not logged in.
    </section>

    <section amp-access="loggedIn">
        <template amp-access-template type="amp-mustache">
            <h3>Hello {{email}}!</h3>

            {{#powerUser}}

<p>You are a power user.</p>

            {{/powerUser}}
        </template>
    </section>

    <center>
        <button amp-access="NOT loggedIn"
            amp-access-hide on="tap:amp-access.login-sign-in">
            Please Login
        </button>
    </center>

    <button amp-access="loggedIn" amp-access-hide
        on="tap:amp-access.login-sign-out">
        Logout
    </button>
</body>

</html>
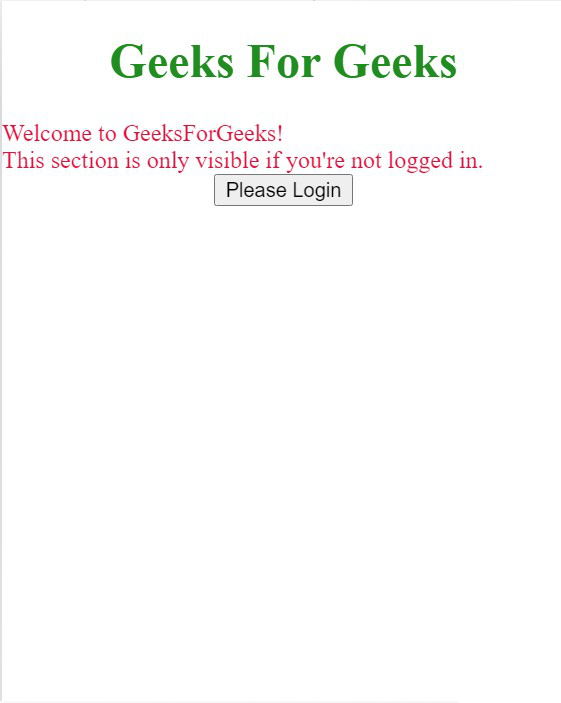
输出:

这是输出窗口
相关用法
- Google AMP amp-ad用法及代码示例
- Google AMP amp-accordion用法及代码示例
- Google AMP amp-facebook-like用法及代码示例
- Google AMP amp-carousel用法及代码示例
- Google AMP amp-date-countdown用法及代码示例
- Google AMP amp-brightcove用法及代码示例
- Google AMP amp-bind-recaptcha用法及代码示例
- Google AMP amp-autocomplete用法及代码示例
- Google AMP amp-img用法及代码示例
- Google AMP amp-image-lightbox用法及代码示例
- Google AMP amp-lightbox-gallery用法及代码示例
- Google AMP amp-soundcloud用法及代码示例
- Google AMP amp-mustache用法及代码示例
注:本文由纯净天空筛选整理自aditya_taparia大神的英文原创作品 Google AMP amp-access。非经特殊声明,原始代码版权归原作者所有,本译文未经允许或授权,请勿转载或复制。
