用法:
Styler.to_latex(buf=None, *, column_format=None, position=None, position_float=None, hrules=None, clines=None, label=None, caption=None, sparse_index=None, sparse_columns=None, multirow_align=None, multicol_align=None, siunitx=False, environment=None, encoding=None, convert_css=False)将 Styler 写入 LaTeX 格式的文件、缓冲区或字符串。
- buf:str,路径对象,file-like 对象,或无,默认无
字符串、路径对象(实现
os.PathLike[str])或 file-like 对象实现字符串write()函数。如果为 None,则结果以字符串形式返回。- column_format:str,可选
放置在以下位置的 LaTeX 列规范:
\开始{表格}{<column_format>}
对于索引和非数字数据列,默认为 ‘l’,对于数字数据列,默认为 ‘r’,如果
siunitx为True,则为“S”。- position:str,可选
放置在位置的表格的 LaTeX 位置参数(例如“h!”):
\\begin{table}[<position>]。- position_float:{“centering”, “raggedleft”, “raggedright”},可选
放置在以下位置的 LaTeX 浮点数命令:
\begin{table}[<位置>]
\<position_float>
如果
environment是“longtable”,则不能使用。- hrules:bool
设置为
True以添加 {booktabs} LaTeX 包中的 \toprule、\midrule 和 \bottomrule。默认为pandas.options.styler.latex.hrules,即False。- clines:str,可选
用于控制为索引标签分隔添加 \cline 命令。可能的值为:
None: no cline commands are added (default).“all;data”: a cline is added for every index value extending the width of the table, including data entries.“all;index”: as above with lines extending only the width of the index entries.“skip-last;data”: a cline is added for each index value except the last level (which is never sparsified), extending the widtn of the table.“skip-last;index”: as above with lines extending only the width of the index entries.
- label:str,可选
LaTeX 标签包括为:\label{<label>}。这与主 .tex 文件中的 \ref{<label>} 一起使用。
- caption:str,元组,可选
如果是字符串,则 LaTeX 表格标题包含为:\caption{<caption>}。如果是元组,即 (“full caption”, “short caption”),标题包含为:\caption[<caption[1]>]{<caption[0]>}。
- sparse_index:布尔型,可选
是否稀疏显示分层索引。设置为 False 将在每行的分层键中显示每个显式级别元素。默认为
pandas.options.styler.sparse.index,即True。- sparse_columns:布尔型,可选
是否稀疏显示分层索引。设置为 False 将在每列的分层键中显示每个显式级别元素。默认为
pandas.options.styler.sparse.columns,即True。- multirow_align:{“c”, “t”, “b”, “naive”},可选
如果稀疏分层 MultiIndexes 是否使用 multirow 包在顶部或底部居中对齐文本。如果没有给出默认值
pandas.options.styler.latex.multirow_align,即“c”。如果给定“naive”,则渲染没有多行。- multicol_align:{“r”, “c”, “l”、“naive-l”、“naive-r”},可选
如果稀疏分层 MultiIndex 列,是否将文本左对齐、居中对齐或右对齐。如果没有给出默认值
pandas.options.styler.latex.multicol_align,即 “r”。如果给出了一个幼稚的选项,则呈现没有 multicol。管道装饰器也可以添加到非天真的值以绘制垂直规则,例如“|r” 将在右对齐合并单元格的左侧绘制一条规则。- siunitx:布尔值,默认为 False
设置为
True以构建与 {siunitx} 包兼容的 LaTeX。- environment:str,可选
如果给定,将替换
\\begin{table}中的 ‘table’ 的环境。如果指定了‘longtable’,则会呈现更合适的模板。如果没有给出默认值pandas.options.styler.latex.environment,即None。- encoding:str,可选
字符编码设置。默认为
pandas.options.styler.render.encoding,即 “utf-8”。- convert_css:布尔值,默认为 False
将简单的cell-styles 从 CSS 转换为 LaTeX 格式。任何未在转换表中找到的 CSS 都会被删除。可以通过添加选项
-latex来强制样式。见注释。
- str 或 None
如果
buf为 None,则将结果作为字符串返回。否则返回None。
参数:
返回:
注意:
乳胶包
对于以下函数,我们推荐以下 LaTeX 包含:
特征
包容性
稀疏列
none:包含在默认 {tabular} 环境中
稀疏行
\usepackage{多行}
hrules
\usepackage{booktabs}
colors
\usepackage[table]{xcolor}
siunitx
\使用包{siunitx}
粗体(带 siunitx)
\usepackage{etoolbox}\robustify\bfseries\sisetup{detect-all = 真}(在 {document} 内)斜体(带有 siunitx)
\usepackage{etoolbox}\robustify\itshape\sisetup{detect-all = 真}(在 {document} 内)environment
\usepackage{longtable} 如果 arg 是 “longtable” |或任何其他相关的环境包
hyperlinks
\使用包{超引用}
单元格样式
只有使用适当的 LaTeX 命令构造了随附的样式函数,才能呈现 LaTeX 样式。所有样式函数都是围绕 CSS
(<attribute>, <value>)对的概念构建的(请参阅表格可视化),这应该由 LaTeX(<command>, <options>)方法代替。每个单元格将使用嵌套的 LaTeX 命令及其随附的选项单独设置样式。例如,以下代码将突出显示 HTML-CSS 中的一个单元格并加粗:
>>> df = pd.DataFrame([[1,2], [3,4]])
>>> s = df.style.highlight_max(axis=None,
...                            props='background-color:red; font-weight:bold;')
>>> s.to_html()
仅使用 LaTeX 命令的等效命令如下:
>>> s = df.style.highlight_max(axis=None,
...                            props='cellcolor:{red}; bfseries: ;')
>>> s.to_latex()
在内部,这些结构化的 LaTeX
(<command>, <options>)对被转换为具有默认结构的display_value:\<command><options> <display_value>。在有多个命令的情况下,后者是递归嵌套的,因此上面的示例高亮单元格呈现为\cellcolor{red} \bfseries 4。有时,这种格式不适合应用的命令,或正在使用的 LaTeX 包的组合,因此可以将额外的标志添加到
<options>,在元组内,导致所需大括号的不同位置(默认与--nowrap):元组格式
输出结构
(<命令>,<选项>)
\<命令><选项> <display_value>
(,
--nowrap)\<命令><选项> <display_value>
(,
--rwrap)\<命令><选项>{<display_value>}
(,
--wrap){\<命令><选项> <display_value>}
(,
--lwrap){\<命令><选项>} <display_value>
(,
--dwrap){\<命令><选项>}{<display_value>}
例如,font-weight 的
textbf命令应始终与-rwrap一起使用,因此('textbf', '--rwrap')将渲染一个用大括号包的工作单元,如\textbf{<display_value>}。一个更全面的例子如下:
>>> df = pd.DataFrame([[1, 2.2, "dogs"], [3, 4.4, "cats"], [2, 6.6, "cows"]],
...                   index=["ix1", "ix2", "ix3"],
...                   columns=["Integers", "Floats", "Strings"])
>>> s = df.style.highlight_max(
...     props='cellcolor:[HTML]{FFFF00}; color:{red};'
...           'textit:--rwrap; textbf:--rwrap;'
... )
>>> s.to_latex()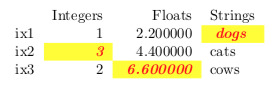
表格样式
Styler 在内部使用其
table_styles对象来解析column_format,position,position_float和label输入参数。这些参数以以下格式添加到表格样式中:set_table_styles([ {"selector": "column_format", "props": f":{column_format};"}, {"selector": "position", "props": f":{position};"}, {"selector": "position_float", "props": f":{position_float};"}, {"selector": "label", "props": f":{{{label.replace(':','§')}}};"} ], overwrite=False)hrules参数例外,事实上,它同时控制所有三个命令:toprule,bottomrule和midrule。除了将hrules设置为True之外,还可以通过手动设置table_styles来设置每个单独的规则定义,例如下面我们设置常规toprule,为bottomrule设置hline并排除midrule:set_table_styles([ {'selector': 'toprule', 'props': ':toprule;'}, {'selector': 'bottomrule', 'props': ':hline;'}, ], overwrite=False)如果将其他
commands添加到表格样式中,它们将被检测到,并直接位于“\begin{tabular}”命令的上方。例如,要从 {colortbl} 包中以\rowcolors{1}{pink}{red}格式添加奇数行和偶数行着色,请使用:set_table_styles([ {'selector': 'rowcolors', 'props': ':{1}{pink}{red};'} ], overwrite=False)使用这些参数的更全面的示例如下:
>>> df.columns = pd.MultiIndex.from_tuples([
...     ("Numeric", "Integers"),
...     ("Numeric", "Floats"),
...     ("Non-Numeric", "Strings")
... ])
>>> df.index = pd.MultiIndex.from_tuples([
...     ("L0", "ix1"), ("L0", "ix2"), ("L1", "ix3")
... ])
>>> s = df.style.highlight_max(
...     props='cellcolor:[HTML]{FFFF00}; color:{red}; itshape:; bfseries:;'
... )
>>> s.to_latex(
...     column_format="rrrrr", position="h", position_float="centering",
...     hrules=True, label="table:5", caption="Styled LaTeX Table",
...     multirow_align="t", multicol_align="r"
... )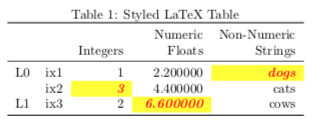
格式化
要格式化值
Styler.format()应该在调用Styler.to_latex之前使用,以及其他方法,例如Styler.hide()例如:>>> s.clear() >>> s.table_styles = [] >>> s.caption = None >>> s.format({ ... ("Numeric", "Integers"): '\${}', ... ("Numeric", "Floats"): '{:.3f}', ... ("Non-Numeric", "Strings"): str.upper ... }) Numeric Non-Numeric Integers Floats Strings L0 ix1 $1 2.200 DOGS ix2 $3 4.400 CATS L1 ix3 $2 6.600 COWS>>> s.to_latex() \begin{tabular}{llrrl} {} & {} & \multicolumn{2}{r}{Numeric} & {Non-Numeric} \\ {} & {} & {Integers} & {Floats} & {Strings} \\ \multirow[c]{2}{*}{L0} & ix1 & \\$1 & 2.200 & DOGS \\ & ix2 & \$3 & 4.400 & CATS \\ L1 & ix3 & \$2 & 6.600 & COWS \\ \end{tabular}CSS 转换
此方法可以使用以下有限的转换将使用 HTML-CSS 构造的 Styler 转换为 LaTeX。
CSS 属性
CSS 值
乳胶命令
乳胶选项
font-weight
大胆的粗体bf系列bf系列font-style
斜体斜它形状形状background-color
红色的#fe01ea#f0eRGB(128,255,0)rgba(128,0,0,0.5)RGB(25%,255,50%)cellcolor
{红色}-lwrap[HTML]{FE01EA}-lwrap[HTML]{FF00EE}-lwrap[rgb]{0.5,1,0}-lwrap[rgb]{0.5,0,0}-lwrap[rgb]{0.25,1,0.5}-lwrapcolor
红色的#fe01ea#f0eRGB(128,255,0)rgba(128,0,0,0.5)RGB(25%,255,50%)color
{红色的}[HTML]{FE01EA}[HTML]{FF00EE}[RGB]{0.5,1,0}[RGB]{0.5,0,0}[RGB]{0.25,1,0.5}还可以使用
--latex标志将用户定义的纯 LaTeX 样式添加到 HTML-CSS Styler,并添加转换器将在 CSS-comment 中检测到的 LaTeX 解析选项。>>> df = pd.DataFrame([[1]]) >>> df.style.set_properties( ... **{"font-weight": "bold /* --dwrap */", "Huge": "--latex--rwrap"} ... ).to_latex(convert_css=True) \begin{tabular}{lr} {} & {0} \\ 0 & {\bfseries}{\Huge{1}} \\ \end{tabular}例子:
下面我们给出一个完整的分步示例,添加一些高级函数并注意一些常见的问题。
首先,我们像往常一样创建 DataFrame 和 Styler,包括 MultiIndex 行和列,它们允许更高级的格式化选项:
>>> cidx = pd.MultiIndex.from_arrays([
...     ["Equity", "Equity", "Equity", "Equity",
...      "Stats", "Stats", "Stats", "Stats", "Rating"],
...     ["Energy", "Energy", "Consumer", "Consumer", "", "", "", "", ""],
...     ["BP", "Shell", "H&M", "Unilever",
...      "Std Dev", "Variance", "52w High", "52w Low", ""]
... ])
>>> iidx = pd.MultiIndex.from_arrays([
...     ["Equity", "Equity", "Equity", "Equity"],
...     ["Energy", "Energy", "Consumer", "Consumer"],
...     ["BP", "Shell", "H&M", "Unilever"]
... ])
>>> styler = pd.DataFrame([
...     [1, 0.8, 0.66, 0.72, 32.1678, 32.1678**2, 335.12, 240.89, "Buy"],
...     [0.8, 1.0, 0.69, 0.79, 1.876, 1.876**2, 14.12, 19.78, "Hold"],
...     [0.66, 0.69, 1.0, 0.86, 7, 7**2, 210.9, 140.6, "Buy"],
...     [0.72, 0.79, 0.86, 1.0, 213.76, 213.76**2, 2807, 3678, "Sell"],
... ], columns=cidx, index=iidx).style
其次,我们将格式化显示,并且由于我们的表很宽,将隐藏索引的重复级别 0:
>>> styler.format(subset="Equity", precision=2)
...       .format(subset="Stats", precision=1, thousands=",")
...       .format(subset="Rating", formatter=str.upper)
...       .format_index(escape="latex", axis=1)
...       .format_index(escape="latex", axis=0)
...       .hide(level=0, axis=0)
请注意,索引和列标题的字符串条目之一是“H&M”。如果不对
format_index方法应用escape=”latex”选项,则生成的 LaTeX 将无法呈现,并且返回的错误很难调试。使用适当的转义将“&” 转换为“\&”。第三,我们将一些 (CSS-HTML) 样式应用于我们的对象。我们将使用内置方法并定义我们自己的方法来突出股票推荐:
>>> def rating_color(v):
...     if v == "Buy": color = "#33ff85"
...     elif v == "Sell": color = "#ff5933"
...     else: color = "#ffdd33"
...     return f"color: {color}; font-weight: bold;"
>>> styler.background_gradient(cmap="inferno", subset="Equity", vmin=0, vmax=1)
...       .applymap(rating_color, subset="Rating")
上述所有样式在转换后都适用于 HTML(见下文)和 LaTeX:
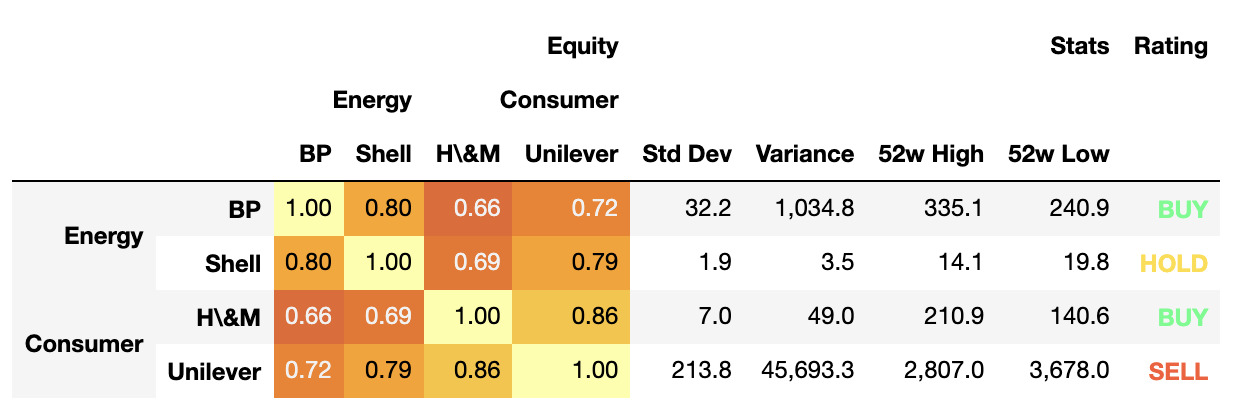
但是,我们最终想要添加一种仅 LaTeX 的样式(来自 {graphicx} 包),它不容易从 CSS 转换,并且 pandas 不支持它。请注意此处使用的
-latex标志以及-rwrap以确保其格式正确且在转换时不会被忽略。>>> styler.applymap_index( ... lambda v: "rotatebox:{45}--rwrap--latex;", level=2, axis=1 ... )最后,我们根据需要添加其他选项来渲染我们的 LaTeX:
>>> styler.to_latex(
...     caption="Selected stock correlation and simple statistics.",
...     clines="skip-last;data",
...     convert_css=True,
...     position_float="centering",
...     multicol_align="|c|",
...     hrules=True,
... )
\begin{table}
\centering
\caption{Selected stock correlation and simple statistics.}
\begin{tabular}{llrrrrrrrrl}
\toprule
 &  & \multicolumn{4}{|c|}{Equity} & \multicolumn{4}{|c|}{Stats} & Rating \\
 &  & \multicolumn{2}{|c|}{Energy} & \multicolumn{2}{|c|}{Consumer} &
\multicolumn{4}{|c|}{} &  \\
 &  & \rotatebox{45}{BP} & \rotatebox{45}{Shell} & \rotatebox{45}{H\&M} &
\rotatebox{45}{Unilever} & \rotatebox{45}{Std Dev} & \rotatebox{45}{Variance} &
\rotatebox{45}{52w High} & \rotatebox{45}{52w Low} & \rotatebox{45}{} \\
\midrule
\multirow[c]{2}{*}{Energy} & BP & {\cellcolor[HTML]{FCFFA4}}
\color[HTML]{000000} 1.00 & {\cellcolor[HTML]{FCA50A}} \color[HTML]{000000}
0.80 & {\cellcolor[HTML]{EB6628}} \color[HTML]{F1F1F1} 0.66 &
{\cellcolor[HTML]{F68013}} \color[HTML]{F1F1F1} 0.72 & 32.2 & 1,034.8 & 335.1
& 240.9 & \color[HTML]{33FF85} \bfseries BUY \\
 & Shell & {\cellcolor[HTML]{FCA50A}} \color[HTML]{000000} 0.80 &
{\cellcolor[HTML]{FCFFA4}} \color[HTML]{000000} 1.00 &
{\cellcolor[HTML]{F1731D}} \color[HTML]{F1F1F1} 0.69 &
{\cellcolor[HTML]{FCA108}} \color[HTML]{000000} 0.79 & 1.9 & 3.5 & 14.1 &
19.8 & \color[HTML]{FFDD33} \bfseries HOLD \\
\cline{1-11}
\multirow[c]{2}{*}{Consumer} & H\&M & {\cellcolor[HTML]{EB6628}}
\color[HTML]{F1F1F1} 0.66 & {\cellcolor[HTML]{F1731D}} \color[HTML]{F1F1F1}
0.69 & {\cellcolor[HTML]{FCFFA4}} \color[HTML]{000000} 1.00 &
{\cellcolor[HTML]{FAC42A}} \color[HTML]{000000} 0.86 & 7.0 & 49.0 & 210.9 &
140.6 & \color[HTML]{33FF85} \bfseries BUY \\
 & Unilever & {\cellcolor[HTML]{F68013}} \color[HTML]{F1F1F1} 0.72 &
{\cellcolor[HTML]{FCA108}} \color[HTML]{000000} 0.79 &
{\cellcolor[HTML]{FAC42A}} \color[HTML]{000000} 0.86 &
{\cellcolor[HTML]{FCFFA4}} \color[HTML]{000000} 1.00 & 213.8 & 45,693.3 &
2,807.0 & 3,678.0 & \color[HTML]{FF5933} \bfseries SELL \\
\cline{1-11}
\bottomrule
\end{tabular}
\end{table}
相关用法
- Python pandas.io.formats.style.Styler.to_excel用法及代码示例
- Python pandas.io.formats.style.Styler.text_gradient用法及代码示例
- Python pandas.io.formats.style.Styler.format_index用法及代码示例
- Python pandas.io.formats.style.Styler.hide用法及代码示例
- Python pandas.io.formats.style.Styler.set_table_attributes用法及代码示例
- Python pandas.io.formats.style.Styler.background_gradient用法及代码示例
- Python pandas.io.formats.style.Styler.set_tooltips用法及代码示例
- Python pandas.io.formats.style.Styler.set_properties用法及代码示例
- Python pandas.io.formats.style.Styler.apply_index用法及代码示例
- Python pandas.io.formats.style.Styler.set_td_classes用法及代码示例
- Python pandas.io.formats.style.Styler.pipe用法及代码示例
- Python pandas.io.formats.style.Styler.where用法及代码示例
- Python pandas.io.formats.style.Styler.format用法及代码示例
- Python pandas.io.formats.style.Styler.highlight_between用法及代码示例
- Python pandas.io.formats.style.Styler.use用法及代码示例
- Python pandas.io.formats.style.Styler.applymap用法及代码示例
- Python pandas.io.formats.style.Styler.applymap_index用法及代码示例
- Python pandas.io.formats.style.Styler.highlight_quantile用法及代码示例
- Python pandas.io.formats.style.Styler.export用法及代码示例
- Python pandas.io.formats.style.Styler.set_table_styles用法及代码示例
注:本文由纯净天空筛选整理自pandas.pydata.org大神的英文原创作品 pandas.io.formats.style.Styler.to_latex。非经特殊声明,原始代码版权归原作者所有,本译文未经允许或授权,请勿转载或复制。