Python OpenCV getWindowImageRect() 函數返回客戶端屏幕坐標,以及包含圖片的窗口的寬度和高度。
cv2.getWindowImageRect()的語法
用法: cv2.getWindowImageRect(window_name)
參數:
- window_name - 顯示圖像/視頻的窗口名稱
返回:返回 x、y、w、h 的元組(四個整數的集合,包括矩形的坐標和大小)和窗口名稱。
演示圖片:

示例 1:使用 getWindowImageRect() Python 獲取默認窗口大小
- 在上述代碼中,導入了Python OpenCV library。路徑變量存儲本地計算機中圖像的文件路徑。
- imread() method 在默認模式下用於將給定文件從路徑加載到圖像變量中。
- 要使用getWindowImageRect()函數,我們需要先使用namedWindow() method創建一個窗口,並使用默認標誌值。
- 創建窗口的getWindowImageRect()函數返回的尺寸和坐標打印在控製台上。返回值也可以單獨賦值並打印。
- 使用imshow()方法將創建的窗口顯示給用戶。等待時間(此處為 0 毫秒)後,用戶可以通過按鍵盤上的任意鍵來銷毀所有窗口。
Python3
# Importing OpenCV
import cv2

# Path to image
path = 'C:/Users/Amisha Kirti/Downloads/GFG.png'

# Reading an image in default mode
image = cv2.imread(path)

# Creating window with name "Display1"
# of default size
cv2.namedWindow("Display1", cv2.WINDOW_AUTOSIZE)

# Using getWindowImageRect()
print(cv2.getWindowImageRect("Display1"))

# Assigning the returned values to variables
(x, y, windowWidth, windowHeight) = cv2.
getWindowImageRect("Display1")

"""
We can also assign values to variables by
accessing returned value by index

x = cv2.getWindowImageRect("Display1")[0]
y = cv2.getWindowImageRect("Display1")[1]
windowWidth=cv2.getWindowImageRect("Display1")[2]
windowHeight=cv2.getWindowImageRect("Display1")[3]
"""

print("Origin Coordinates(x,y): ", x, y)
print("Width: ", windowWidth)
print("Height: ", windowHeight)

# Displaying the image using imshow
cv2.imshow('Display1', image)

# Waiting 0ms for user to press any key
cv2.waitKey(0)

# Destroying all windows open on screen
cv2.destroyAllWindows()
輸出:

示例 1 控製台和窗口輸出
示例 2:使用 getWindowImageRect() Python 獲取全屏窗口大小
該函數幫助我們獲得顯示圖像的窗口的確切像素數。
- 可以在全屏模式下創建一個窗口並獲取其寬度和高度
- 要使用getWindowImageRect()函數,我們需要首先使用namedWindow() method創建一個窗口。在此示例中,使用WINDOW_FULLSCREEN 或WINDOW_NORMAL 標誌值。
Python3
# Importing OpenCV
import cv2

# Path to image [NOTE: Here resized image
# is used to be able to fit to screen]
path = 'download3.png'

# Reading an image in default mode
image = cv2.imread(path)

# Creating a full screen window with
# name "Display2" using WINDOW_FULLSCREEN
# or WINDOW_NORMAL
cv2.namedWindow("Display2", cv2.WINDOW_NORMAL)

# Using getWindowImageRect()
print(cv2.getWindowImageRect("Display2"))

# Assigning the returned values to variables
(x, y, windowWidth, windowHeight) = cv2.
        getWindowImageRect("Display2")

print("Origin Coordinates(x,y): ", x, y)
print("Width: ", windowWidth)
print("Height: ", windowHeight)

# Displaying the image using imshow
cv2.imshow('Display2', image)

# Waiting 0ms for user to press any key
cv2.waitKey(0)

# Destroying all created windows
# open on screen
cv2.destroyAllWindows()
輸出:

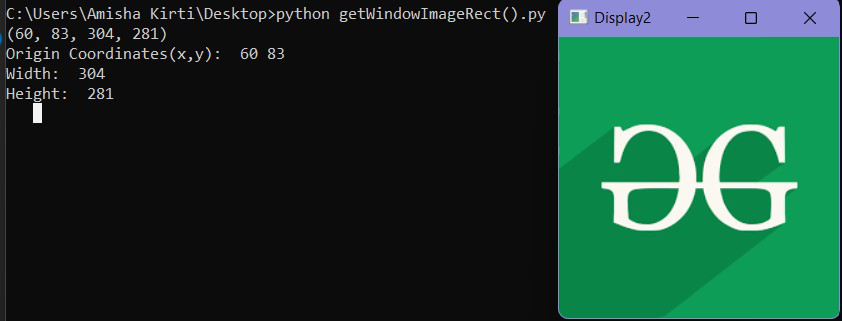
示例 2 窗口輸出

示例 2 控製台輸出
相關用法
- Python OpenCV getgaussiankernel()用法及代碼示例
- Python OpenCV getRotationMatrix2D()用法及代碼示例
- Python OpenCV getTrackbarPos()用法及代碼示例
- Python OpenCV cv2.circle()用法及代碼示例
- Python OpenCV cv2.blur()用法及代碼示例
- Python OpenCV cv2.ellipse()用法及代碼示例
- Python OpenCV cv2.cvtColor()用法及代碼示例
- Python OpenCV cv2.copyMakeBorder()用法及代碼示例
- Python OpenCV cv2.imread()用法及代碼示例
- Python OpenCV cv2.imshow()用法及代碼示例
- Python OpenCV cv2.imwrite()用法及代碼示例
- Python OpenCV cv2.putText()用法及代碼示例
- Python OpenCV cv2.rectangle()用法及代碼示例
- Python OpenCV cv2.arrowedLine()用法及代碼示例
- Python OpenCV cv2.erode()用法及代碼示例
- Python OpenCV cv2.line()用法及代碼示例
- Python OpenCV cv2.flip()用法及代碼示例
- Python OpenCV cv2.transpose()用法及代碼示例
- Python OpenCV cv2.rotate()用法及代碼示例
- Python OpenCV cv2.polylines()用法及代碼示例
- Python OpenCV Canny()用法及代碼示例
- Python OpenCV destroyAllWindows()用法及代碼示例
- Python OpenCV Filter2D()用法及代碼示例
- Python OpenCV haveImageReader()用法及代碼示例
- Python OpenCV imdecode()用法及代碼示例
注:本文由純淨天空篩選整理自amishakirti6410大神的英文原創作品 Python OpenCV – getWindowImageRect() Function。非經特殊聲明,原始代碼版權歸原作者所有,本譯文未經允許或授權,請勿轉載或複製。
