問題描述:tensorflow中tf.nn.conv2d的作用/用途是什麽?
在看關於tf.nn.conv2d (這裏)的tensorflow文檔時,不明白它的作用或試圖達到的目的。文檔上說,
#1 : Flattens the filter to a 2-D matrix with shape
[filter_height * filter_width * in_channels, output_channels].
這是什麽意思呢?是element-wise乘法還是僅矩陣乘法?我也無法理解文檔中提到的其他兩點:
# 2: Extracts image patches from the the input tensor to form a virtual tensor of shape
[batch, out_height, out_width, filter_height * filter_width * in_channels].# 3: For each patch, right-multiplies the filter matrix and the image patch vector.
如果有人可以舉一個例子,或給一段代碼(極其有用)並解釋那裏發生了什麽以及為什麽這樣的操作,那將真的很有幫助。
我嘗試編碼一小部分並打印出操作的形狀。不過,我還是不明白。
我嘗試過這樣的事情:
op = tf.shape(tf.nn.conv2d(tf.random_normal([1,10,10,10]),
              tf.random_normal([2,10,10,10]),
              strides=[1, 2, 2, 1], padding='SAME'))

with tf.Session() as sess:
    result = sess.run(op)
    print(result)
另外此,我也實現了一個簡單得多的代碼。結果如下,但是我不知道發生了什麽。
input = tf.Variable(tf.random_normal([1,2,2,1]))
filter = tf.Variable(tf.random_normal([1,1,1,1]))

op = tf.nn.conv2d(input, filter, strides=[1, 1, 1, 1], padding='SAME')
init = tf.initialize_all_variables()
with tf.Session() as sess:
    sess.run(init)

    print("input")
    print(input.eval())
    print("filter")
    print(filter.eval())
    print("result")
    result = sess.run(op)
    print(result)
輸出
input
[[[[ 1.60314465]
   [-0.55022103]]

  [[ 0.00595062]
   [-0.69889867]]]]
filter
[[[[-0.59594476]]]]
result
[[[[-0.95538563]
   [ 0.32790133]]

  [[-0.00354624]
   [ 0.41650501]]]]
最佳回答(簡單說明)
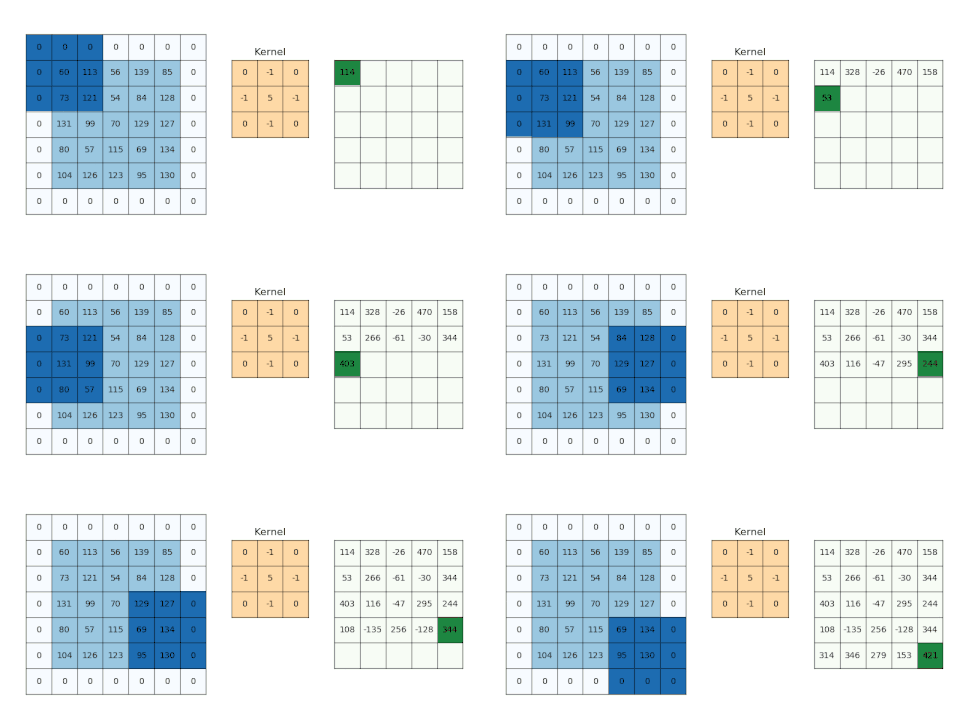
二維卷積的計算方法與計算1D 卷積的方法類似:將內核滑過輸入,計算element-wise乘法並將其相加。但是它們核核輸入不是是數組,而是矩陣。
在最基本的示例中,沒有padding(填充)且strip= 1。假設您的input和kernel是:

使用內核時,您將得到以下輸出:,它是通過以下方式計算的:

- 14 = 4 * 1 + 3 * 0 + 1 * 1 + 2 * 2 + 1 * 1 + 0 * 0 + 1 * 0 + 2 * 0 + 4 * 1
- 6 = 3 * 1 + 1 * 0 + 0 * 1 + 1 * 2 + 0 * 1 + 1 * 0 + 2 * 0 + 4 * 0 + 1 * 1
- 6 = 2 * 1 + 1 * 0 + 0 * 1 + 1 * 2 + 2 * 1 + 4 * 0 + 3 * 0 + 1 * 0 + 0 * 1
- 12 = 1 * 1 + 0 * 0 + 1 * 1 + 2 * 2 + 4 * 1 + 1 * 0 + 1 * 0 + 0 * 0 + 2 * 1
TF的conv2d函數批量計算卷積,並使用略有不同的格式。對於輸入,它是[batch, in_height, in_width, in_channels];對於內核,它是[filter_height, filter_width, in_channels, out_channels]。因此,我們需要以正確的格式提供數據:
import tensorflow as tf
k = tf.constant([
    [1, 0, 1],
    [2, 1, 0],
    [0, 0, 1]
], dtype=tf.float32, name='k')
i = tf.constant([
    [4, 3, 1, 0],
    [2, 1, 0, 1],
    [1, 2, 4, 1],
    [3, 1, 0, 2]
], dtype=tf.float32, name='i')
kernel = tf.reshape(k, [3, 3, 1, 1], name='kernel')
image  = tf.reshape(i, [1, 4, 4, 1], name='image')
然後用以下公式計算卷積:
res = tf.squeeze(tf.nn.conv2d(image, kernel, [1, 1, 1, 1], "VALID"))
# VALID means no padding
with tf.Session() as sess:
   print sess.run(res)
這將等於我們手工計算的結果。
有padding和stride的例子,見這裏:examples with padding/strides。
次佳回答(由簡入繁)
這裏提供解釋這個問題的簡單方法。
示例是1張圖片,大小為2×2,帶有1個通道。有1個尺寸為1×1的過濾器和1個通道(尺寸為高度x寬度x通道x過濾器數)。
對於這種簡單情況,所得到的2×2、1通道圖像(尺寸1x2x2x1,圖像數量x高x寬x x通道)是將濾波器值乘以圖像的每個像素的結果。
現在讓我們嘗試更多channel(通道):
input = tf.Variable(tf.random_normal([1,3,3,5]))
filter = tf.Variable(tf.random_normal([1,1,5,1]))

op = tf.nn.conv2d(input, filter, strides=[1, 1, 1, 1], padding='VALID')
這裏的3×3圖像和1×1濾鏡分別具有5個通道。生成的圖像將是具有1個通道的3×3(尺寸為1x3x3x1),其中每個像素的值是filter通道與輸入圖像中相應像素的點積。
現在有3×3 filter
input = tf.Variable(tf.random_normal([1,3,3,5]))
filter = tf.Variable(tf.random_normal([3,3,5,1]))

op = tf.nn.conv2d(input, filter, strides=[1, 1, 1, 1], padding='VALID')
在這裏,我們得到一個1×1圖像,帶有1個通道(大小為1x1x1x1)。該值是9個5元素點積的總和。但是您可以將其稱為45元素點積。
現在有了更大的圖像
input = tf.Variable(tf.random_normal([1,5,5,5]))
filter = tf.Variable(tf.random_normal([3,3,5,1]))

op = tf.nn.conv2d(input, filter, strides=[1, 1, 1, 1], padding='VALID')
輸出為3×3 1通道圖像(大小為1x3x3x1)。每個值都是9個5元素點積的總和。
通過將filter居中於輸入圖像的9個中心像素之一上來進行每個輸出,從而使任何filter都不伸出。下麵的x表示每個輸出像素的濾鏡中心。
.....
.xxx.
.xxx.
.xxx.
.....
現在使用”SAME”填充:
input = tf.Variable(tf.random_normal([1,5,5,5]))
filter = tf.Variable(tf.random_normal([3,3,5,1]))

op = tf.nn.conv2d(input, filter, strides=[1, 1, 1, 1], padding='SAME')
這給出了5×5的輸出圖像(大小為1x5x5x1)。這是通過將filter居中放置在圖像上的每個位置來完成的。
filter超出圖像邊的任何5元素點積的值均為零。
因此,角僅是4個5元素點積的總和。
現在有多個過濾器。
input = tf.Variable(tf.random_normal([1,5,5,5]))
filter = tf.Variable(tf.random_normal([3,3,5,7]))

op = tf.nn.conv2d(input, filter, strides=[1, 1, 1, 1], padding='SAME')
這仍然會提供5×5的輸出圖像,但具有7個通道(大小為1x5x5x7)。每個通道由集合中的一個Filter產生。
現在使用stride=2,2:
input = tf.Variable(tf.random_normal([1,5,5,5]))
filter = tf.Variable(tf.random_normal([3,3,5,7]))

op = tf.nn.conv2d(input, filter, strides=[1, 2, 2, 1], padding='SAME')
現在結果仍然有7個通道,但隻有3×3(大小為1x3x3x7)。
這是因為濾鏡不是以圖像上的每個點為中心,而是以寬度2的步長(步幅)以圖像上的每個其他點為中心。下麵的x代表每個輸出像素的濾鏡中心,在輸入圖像上。
x.x.x
.....
x.x.x
.....
x.x.x
當然,輸入的第一維是圖像數,因此您可以將其應用於10張圖像的批處理中,例如:
input = tf.Variable(tf.random_normal([10,5,5,5]))
filter = tf.Variable(tf.random_normal([3,3,5,7]))

op = tf.nn.conv2d(input, filter, strides=[1, 2, 2, 1], padding='SAME')
這將對每個圖像獨立執行相同的操作,從而得到10張圖像的堆疊(大小為10x3x3x7)
Conv2d的代碼示例
我試圖實現conv2d(供我學習)。好吧,我寫道:
def conv(ix, w):
   # filter shape: [filter_height, filter_width, in_channels, out_channels]
   # flatten filters
   filter_height = int(w.shape[0])
   filter_width = int(w.shape[1])
   in_channels = int(w.shape[2])
   out_channels = int(w.shape[3])
   ix_height = int(ix.shape[1])
   ix_width = int(ix.shape[2])
   ix_channels = int(ix.shape[3])
   filter_shape = [filter_height, filter_width, in_channels, out_channels]
   flat_w = tf.reshape(w, [filter_height * filter_width * in_channels, out_channels])
   patches = tf.extract_image_patches(
       ix,
       ksizes=[1, filter_height, filter_width, 1],
       strides=[1, 1, 1, 1],
       rates=[1, 1, 1, 1],
       padding='SAME'
   )
   patches_reshaped = tf.reshape(patches, [-1, ix_height, ix_width, filter_height * filter_width * ix_channels])
   feature_maps = []
   for i in range(out_channels):
       feature_map = tf.reduce_sum(tf.multiply(flat_w[:, i], patches_reshaped), axis=3, keep_dims=True)
       feature_maps.append(feature_map)
   features = tf.concat(feature_maps, axis=3)
   return features
希望我做得正確。經MNIST檢查,結果非常接近(但此實現速度較慢)。我希望這可以幫助你。
圖示:

參考資料
