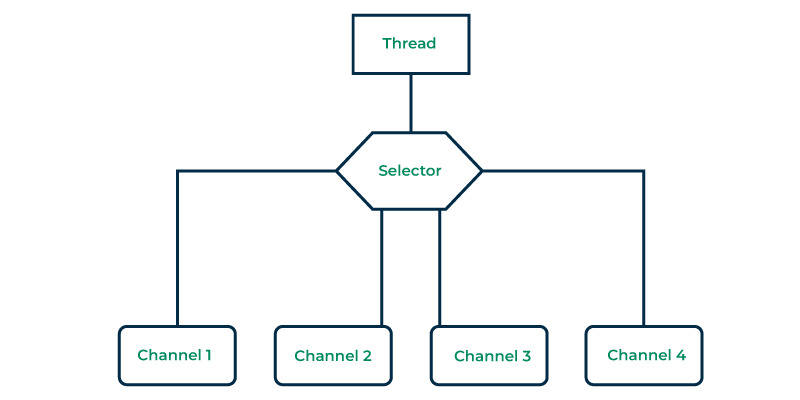
选择器是一种工具,可帮助您关注一个或多个 NIO 通道并确定它们何时准备好传输数据。在Java NIO,选择器是查看多个的关键角色Java NIO 通道实例并找出哪些适合进行阅读或写作等活动。
这允许单个线程处理多个通道,从而可以轻松管理多个网络连接。
为什么选择器?
使用选择器可以帮助我们用更少的线程做更多的事情,只需一个而不是多个。频繁的线程切换会给操作系统带来负担并耗尽内存。
- 我们使用的线程越少,系统的效率就越高。
- 值得注意的是,现代操作系统和 CPU 在处理多个任务方面做得越来越好。
- 有助于减少随着时间的推移使用多个线程的资源需求。
选择器不仅可以读取数据,还可以监视传入的网络连接,并使通过较慢的通道发送数据变得更容易。
如何创建选择器?
只需使用 Selector 类的 open 方法即可创建选择器。此方法利用系统的默认选择器提供程序来生成新的选择器
Selector selector = Selector.open();
使用选择器注册通道
为了让选择器监视任何通道,我们必须向选择器注册这些通道。
这是通过调用 SelectableChannel 的 register 方法来完成的。但是,在向选择器注册之前,通道必须处于非阻塞模式:
channel.configureBlocking(false);
SelectionKey selectionKey = channel.register(selector, SelectionKey.OP_READ);
第二个参数定义了一个兴趣集,这意味着我们有兴趣通过选择器在受监控的通道中侦听哪些事件。
您可以收听四种不同的事件:
- 连接:当客户端尝试连接到服务器(SelectionKey.OP_CONNECT)。
- 接受:当服务器接受来自 a 的连接时客户端(SelectionKey.OP_ACCEPT)。
- 读:当服务器准备好读取时频道(SelectionKey.OP_READ)。
- 写:当服务器准备好写入时频道(SelectionKey.OP_WRITE)。
选择键
正如您在上一节中看到的,当我们向选择器注册 Channel 时,register() 方法返回 SelectionKey 对象。这个SelectionKey对象包含一些有趣的属性:
- 兴趣设定
- 准备好的套装
- 这个频道
- 选择器
- 附加对象
兴趣集
兴趣集指定选择器应在通道上监视的事件。该兴趣集表示为整数值,我们可以如下检索该信息。
int set = selectionKey.interestOps();
boolean isAccept  = set & SelectionKey.OP_ACCEPT;
boolean isConnect = set & SelectionKey.OP_CONNECT;
boolean isRead = set & SelectionKey.OP_READ;
boolean isWrite = set & SelectionKey.OP_WRITE;
最初,我们使用SelectionKey的interestOps方法获取兴趣集。
当我们对这两个值进行按位与运算时,它会产生一个布尔值,指示事件是否正在被监视。
准备好的套装
就绪集是通道已准备好的操作集。我们可以像下面这样访问准备好的集合。
int readySet = selectionKey.readyOps();
我们还可以使用下面四种方法来代替,它们都返回一个布尔值。
- SelectionKey.isAcceptable();
- SelectionKey.isConnectable();
- SelectionKey.isReadable();
- SelectionKey.isWritable();
这个频道
我们可以通过selectionKey访问频道,如下所示:
Channel channel = selectionKey.channel();
选择器
我们可以从selectionKey对象中获取selector对象,如下所示:
Selector selector = selectionKey.selector();
附加对象
我们可以将一个对象附加到 SelectionKey。以下是我们如何从 SelectionKey 附加和获取对象:
selectionKey.attach(object);
Object attachedObject = selectionKey.attachment();
频道键选择
一旦我们向选择器注册了一个或多个通道,我们就可以使用 select() 方法之一。这些方法为我们提供了 “ready” 的通道,用于我们关心的事件(例如连接、接受、读取或写入)。
int channels = selector.select();
int channels = selector.select(long timeout);
int channels = selector.selectNow();
- select() 会阻塞,除非有一个通道准备好接收我们注册的事件。
- select(long timeout) 的作用与上面相同,只是它会阻塞最大超时毫秒数。
- selectNow() 根本不阻塞。无论通道准备就绪,它都会立即返回。
一旦我们调用了select()方法及其返回值表明一个或多个通道已就绪,您可以通过选定的键集访问就绪通道,方法是调用selectedKeys()方法如下:
Set<SelectionKey> selectedKeys = selector.selectedKeys();
其他选择器方法
我们还提到了更多可用的选择器方法,并提供了正确的说明和用法。
|
方法 |
用法 |
说明 |
用法 |
|---|---|---|---|
|
wakeup() |
选择器.wakeup(); |
wakeup() 方法用于中断阻塞select() 调用。通常从另一个线程调用它来唤醒 select() 方法。 |
当需要修改Selector或阻止其阻塞时,可以使用wakeup()唤醒select()调用并使其返回。 |
|
close() |
选择器.close(); |
close()方法用于关闭选择器。一旦选择器关闭,它就不能再用于监视通道。 |
使用完选择器后关闭它以释放系统资源非常重要。 |
实际例子
让我们探索几个实际示例来了解 Selector 类的实际应用。
示例 1:简单的选择器用法
在此示例中,我们将使用 Java NIO 选择器来监视单个非阻塞 SocketChannel 的读取操作。步骤如下:
- 创建一个选择器来有效管理 I/O 就绪监控。
- 配置非阻塞SocketChannel用于从远程服务器读取数据。
- 使用选择器注册SocketChannel,指定您感兴趣的OP_READ 操作。
- 使用选择器.select()等待至少一个注册通道准备好读取。
// Create a Selector
Selector selector = Selector.open();
// Configure and register a non-blocking SocketChannel for read operationsSocketChannel
socketChannel = SocketChannel.open(new InetSocketAddress("example.com", 80));
socketChannel.configureBlocking(false);
socketChannel.register(selector, SelectionKey.OP_READ);
// Wait for a ready channelint
readyChannels = selector.select();
示例 2:使用多个通道
在此示例中,我们扩展了 Java NIO 选择器的使用来管理多个通道,每个通道具有不同的 I/O 操作。步骤如下:
- 创建一个选择器来有效管理 I/O 就绪监控。
- 根据您的应用程序需求创建和配置多个通道。
- 使用选择器注册每个通道,指定您对每个通道感兴趣的特定 I/O 操作。
- 采用选择器.select()有效地等待至少一个已注册的通道准备好执行其指定的操作(例如,读或写)。
// Create a Selector
Selector selector = Selector.open();
// Create and configure multiple channels
SocketChannel channel1 = /* Create and configure your channel */;
SocketChannel channel2 = /* Create and configure another channel */;
// Register channels for specific operations
channel1.register(selector, SelectionKey.OP_READ);
channel2.register(selector, SelectionKey.OP_WRITE);
// Wait for ready channelsint ready
Channels = selector.select();
完整示例
为了练习我们在前面几节中学到的知识,让我们看一个完整的client-server示例
- 我们将构建一个回显服务器和一个回显客户端。
- 在这种设置中,客户端连接到服务器并开始向其发送消息。
- 服务器回显每个客户端发送的消息。
当服务器遇到特定的消息,如end,则将其解释为通信结束,并关闭与客户端的连接
创建服务器:NIOServer.java
Java
//Java Program to test
//echo server using NIO Selector
import java.io.IOException;
import java.net.InetSocketAddress;
import java.nio.ByteBuffer;
import java.nio.channels.SelectionKey;
import java.nio.channels.Selector;
import java.nio.channels.ServerSocketChannel;
import java.nio.channels.SocketChannel;
import java.util.Iterator;
import java.util.Set;
//Driver class for NIOServer
public class NIOServer {
//Main method
public static void main(String[] args) throws IOException {
// Create a new Selector
Selector selector = Selector.open();
// Create a ServerSocketChannel, bind it, and configure it as non-blocking
ServerSocketChannel serverChannel = ServerSocketChannel.open();
serverChannel.bind(new InetSocketAddress("localhost", 5454));
serverChannel.configureBlocking(false);
// Register the server socket channel with the Selector for accepting connections
serverChannel.register(selector, SelectionKey.OP_ACCEPT);
ByteBuffer buffer = ByteBuffer.allocate(256);
System.out.println("Server started and listening on port 5454...");
while (true) {
// Select ready channels using the Selector
selector.select();
// Get the set of selected keys
Set<SelectionKey> selectedKeys = selector.selectedKeys();
Iterator<SelectionKey> keyIterator = selectedKeys.iterator();
while (keyIterator.hasNext()) {
SelectionKey key = keyIterator.next();
if (key.isAcceptable()) {
// Accept a new client connection
ServerSocketChannel server = (ServerSocketChannel) key.channel();
SocketChannel clientChannel = server.accept();
clientChannel.configureBlocking(false);
// Register the client channel with the Selector for reading
clientChannel.register(selector, SelectionKey.OP_READ);
}
if (key.isReadable()) {
// Read data from the client
SocketChannel client = (SocketChannel) key.channel();
buffer.clear();
int bytesRead = client.read(buffer);
if (bytesRead == -1) {
// Client closed the connection
key.cancel();
client.close();
continue;
}
buffer.flip();
String receivedMessage = new String(buffer.array(), 0, bytesRead);
// Process the received message (e.g., echo it back to the client)
System.out.println("Received: " + receivedMessage);
// Prepare the buffer for writing and echo the received message back to the client
buffer.rewind();
client.write(buffer);
}
// Remove the processed key from the set
keyIterator.remove();
}
}
}
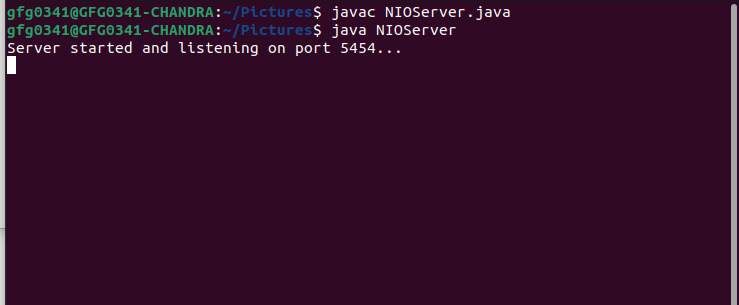
}NIO服务器的输出:
解释
- 该代码是 Java NIO 的实现回显服务器.
- 它使用一个选择器以实现高效的 I/O 处理。
- 侦听端口 5454、接受连接并回显收到的数据。
- 非阻塞 I/O 允许同时处理多个连接。
- 服务器循环监视注册通道上的事件。
- 接受的连接被注册以供读取,并且数据被回显给客户端。
创建客户端:NIOClient.java
在此示例中,我们将使用 SocketChannel 创建一个 NIOClient。
Java
//Java Program to create a
//echo client using NIO Selector
import java.io.IOException;
import java.net.InetSocketAddress;
import java.nio.ByteBuffer;
import java.nio.channels.SocketChannel;
//Driver class for NIOClient
public class NIOClient {
//Main method
public static void main(String[] args) throws IOException {
// Create a socket channel and connect to the server
SocketChannel clientChannel = SocketChannel.open();
clientChannel.connect(new InetSocketAddress("localhost", 5454));
ByteBuffer buffer = ByteBuffer.allocate(256);
String message = "Hello, NIO Server!";
// Message to send to the server
buffer.clear();
buffer.put(message.getBytes());
buffer.flip();
// Send the message to the server
while (buffer.hasRemaining()) {
clientChannel.write(buffer);
}
buffer.clear();
// Read the server's response
clientChannel.read(buffer);
buffer.flip();
// Convert the response to a String and print it
String response = new String(buffer.array(), 0, buffer.limit());
System.out.println("Server Response: " + response);
clientChannel.close();
}
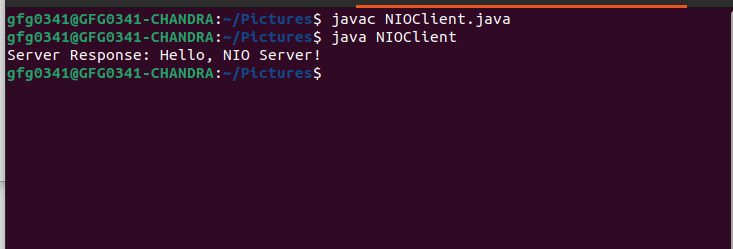
}NIO客户端的输出:
上述程序的解释:
- 创建一个
SocketChannel并通过端口 5454 连接到本地主机上的服务器。 - 准备一条消息(“Hello,NIO Server!”)并将其发送到服务器。
- 将服务器的响应读入缓冲区并将其转换为字符串。
- 打印服务器的响应。
- 通信后关闭客户端通道。
结论
java.nio.channels.Selector类是掌握 Java 中非阻塞 I/O 的重要组件。通过了解如何创建选择器, 与SelectionKey对象,并利用select()方法,我们可以显著提高 Java 应用程序的效率和响应能力。
相关用法
- Java java.nio.channels.spi.SelectorProvider用法及代码示例
- Java java.nio.channels.spi.AsynchronousChannelProvider用法及代码示例
- Java java.nio.charset.CoderResult用法及代码示例
- Java java.nio.charset.CodingErrorAction用法及代码示例
- Java java.nio.charset.CharsetEncoder用法及代码示例
- Java java.nio.charset.Charset用法及代码示例
- Java java.nio.ByteBuffer用法及代码示例
- Java java.nio.IntBuffer用法及代码示例
- Java java.nio.file.FileStore用法及代码示例
- Java java.nio.FloatBuffer用法及代码示例
- Java java.nio.file.LinkPermission用法及代码示例
- Java java.nio.ShortBuffer用法及代码示例
- Java java.nio.DoubleBuffer用法及代码示例
- Java java.nio.file.attribute.AclEntry用法及代码示例
- Java java.nio.LongBuffer用法及代码示例
- Java java.nio.file.spi.FileTypeDetector用法及代码示例
- Java java.nio.ByteOrder用法及代码示例
- Java java.nio.file.attribute.FileTime用法及代码示例
- Java java.nio.file.SimpleFileVisitor用法及代码示例
- Java java.nio.file.FileSystems用法及代码示例
- Java java.nio.CharBuffer用法及代码示例
- Java java.nio.Buffer用法及代码示例
- Java java.nio.file.FileSystem用法及代码示例
- Java java.nio.file.Paths用法及代码示例
- Java java.net.SocketException用法及代码示例
注:本文由纯净天空筛选整理自lavkumar5大神的英文原创作品 java.nio.channels.Selector Class in Java。非经特殊声明,原始代码版权归原作者所有,本译文未经允许或授权,请勿转载或复制。