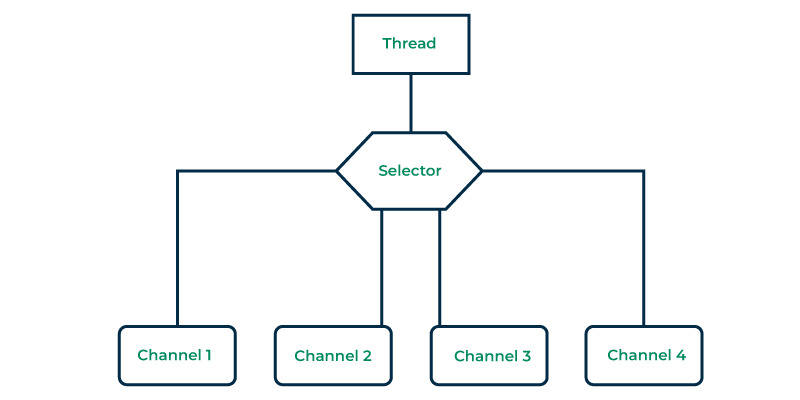
選擇器是一種工具,可幫助您關注一個或多個 NIO 通道並確定它們何時準備好傳輸數據。在Java NIO,選擇器是查看多個的關鍵角色Java NIO 通道實例並找出哪些適合進行閱讀或寫作等活動。
這允許單個線程處理多個通道,從而可以輕鬆管理多個網絡連接。

為什麽選擇器?
使用選擇器可以幫助我們用更少的線程做更多的事情,隻需一個而不是多個。頻繁的線程切換會給操作係統帶來負擔並耗盡內存。
- 我們使用的線程越少,係統的效率就越高。
- 值得注意的是,現代操作係統和 CPU 在處理多個任務方麵做得越來越好。
- 有助於減少隨著時間的推移使用多個線程的資源需求。
選擇器不僅可以讀取數據,還可以監視傳入的網絡連接,並使通過較慢的通道發送數據變得更容易。
如何創建選擇器?
隻需使用 Selector 類的 open 方法即可創建選擇器。此方法利用係統的默認選擇器提供程序來生成新的選擇器
Selector selector = Selector.open();
使用選擇器注冊通道
為了讓選擇器監視任何通道,我們必須向選擇器注冊這些通道。
這是通過調用 SelectableChannel 的 register 方法來完成的。但是,在向選擇器注冊之前,通道必須處於非阻塞模式:
channel.configureBlocking(false);
SelectionKey selectionKey = channel.register(selector, SelectionKey.OP_READ);
第二個參數定義了一個興趣集,這意味著我們有興趣通過選擇器在受監控的通道中偵聽哪些事件。
您可以收聽四種不同的事件:
- 連接:當客戶端嘗試連接到服務器(SelectionKey.OP_CONNECT)。
- 接受:當服務器接受來自 a 的連接時客戶端(SelectionKey.OP_ACCEPT)。
- 讀:當服務器準備好讀取時頻道(SelectionKey.OP_READ)。
- 寫:當服務器準備好寫入時頻道(SelectionKey.OP_WRITE)。
選擇鍵
正如您在上一節中看到的,當我們向選擇器注冊 Channel 時,register() 方法返回 SelectionKey 對象。這個SelectionKey對象包含一些有趣的屬性:
- 興趣設定
- 準備好的套裝
- 這個頻道
- 選擇器
- 附加對象
興趣集
興趣集指定選擇器應在通道上監視的事件。該興趣集表示為整數值,我們可以如下檢索該信息。
int set = selectionKey.interestOps();
boolean isAccept  = set & SelectionKey.OP_ACCEPT;
boolean isConnect = set & SelectionKey.OP_CONNECT;
boolean isRead = set & SelectionKey.OP_READ;
boolean isWrite = set & SelectionKey.OP_WRITE;
最初,我們使用SelectionKey的interestOps方法獲取興趣集。
當我們對這兩個值進行按位與運算時,它會產生一個布爾值,指示事件是否正在被監視。
準備好的套裝
就緒集是通道已準備好的操作集。我們可以像下麵這樣訪問準備好的集合。
int readySet = selectionKey.readyOps();
我們還可以使用下麵四種方法來代替,它們都返回一個布爾值。
- SelectionKey.isAcceptable();
- SelectionKey.isConnectable();
- SelectionKey.isReadable();
- SelectionKey.isWritable();
這個頻道
我們可以通過selectionKey訪問頻道,如下所示:
Channel channel = selectionKey.channel();
選擇器
我們可以從selectionKey對象中獲取selector對象,如下所示:
Selector selector = selectionKey.selector();
附加對象
我們可以將一個對象附加到 SelectionKey。以下是我們如何從 SelectionKey 附加和獲取對象:
selectionKey.attach(object);
Object attachedObject = selectionKey.attachment();
頻道鍵選擇
一旦我們向選擇器注冊了一個或多個通道,我們就可以使用 select() 方法之一。這些方法為我們提供了 “ready” 的通道,用於我們關心的事件(例如連接、接受、讀取或寫入)。
int channels = selector.select();
int channels = selector.select(long timeout);
int channels = selector.selectNow();
- select() 會阻塞,除非有一個通道準備好接收我們注冊的事件。
- select(long timeout) 的作用與上麵相同,隻是它會阻塞最大超時毫秒數。
- selectNow() 根本不阻塞。無論通道準備就緒,它都會立即返回。
一旦我們調用了select()方法及其返回值表明一個或多個通道已就緒,您可以通過選定的鍵集訪問就緒通道,方法是調用selectedKeys()方法如下:
Set<SelectionKey> selectedKeys = selector.selectedKeys();
其他選擇器方法
我們還提到了更多可用的選擇器方法,並提供了正確的說明和用法。
|
方法 |
用法 |
說明 |
用法 |
|---|---|---|---|
|
wakeup() |
選擇器.wakeup(); |
wakeup() 方法用於中斷阻塞select() 調用。通常從另一個線程調用它來喚醒 select() 方法。 |
當需要修改Selector或阻止其阻塞時,可以使用wakeup()喚醒select()調用並使其返回。 |
|
close() |
選擇器.close(); |
close()方法用於關閉選擇器。一旦選擇器關閉,它就不能再用於監視通道。 |
使用完選擇器後關閉它以釋放係統資源非常重要。 |
實際例子
讓我們探索幾個實際示例來了解 Selector 類的實際應用。
示例 1:簡單的選擇器用法
在此示例中,我們將使用 Java NIO 選擇器來監視單個非阻塞 SocketChannel 的讀取操作。步驟如下:
- 創建一個選擇器來有效管理 I/O 就緒監控。
- 配置非阻塞SocketChannel用於從遠程服務器讀取數據。
- 使用選擇器注冊SocketChannel,指定您感興趣的OP_READ 操作。
- 使用選擇器.select()等待至少一個注冊通道準備好讀取。
// Create a Selector
Selector selector = Selector.open();
// Configure and register a non-blocking SocketChannel for read operationsSocketChannel
socketChannel = SocketChannel.open(new InetSocketAddress("example.com", 80));
socketChannel.configureBlocking(false);
socketChannel.register(selector, SelectionKey.OP_READ);
// Wait for a ready channelint
readyChannels = selector.select();
示例 2:使用多個通道
在此示例中,我們擴展了 Java NIO 選擇器的使用來管理多個通道,每個通道具有不同的 I/O 操作。步驟如下:
- 創建一個選擇器來有效管理 I/O 就緒監控。
- 根據您的應用程序需求創建和配置多個通道。
- 使用選擇器注冊每個通道,指定您對每個通道感興趣的特定 I/O 操作。
- 采用選擇器.select()有效地等待至少一個已注冊的通道準備好執行其指定的操作(例如,讀或寫)。
// Create a Selector
Selector selector = Selector.open();
// Create and configure multiple channels
SocketChannel channel1 = /* Create and configure your channel */;
SocketChannel channel2 = /* Create and configure another channel */;
// Register channels for specific operations
channel1.register(selector, SelectionKey.OP_READ);
channel2.register(selector, SelectionKey.OP_WRITE);
// Wait for ready channelsint ready
Channels = selector.select();
完整示例
為了練習我們在前麵幾節中學到的知識,讓我們看一個完整的client-server示例
- 我們將構建一個回顯服務器和一個回顯客戶端。
- 在這種設置中,客戶端連接到服務器並開始向其發送消息。
- 服務器回顯每個客戶端發送的消息。
當服務器遇到特定的消息,如end,則將其解釋為通信結束,並關閉與客戶端的連接
創建服務器:NIOServer.java
Java
//Java Program to test
//echo server using NIO Selector

import java.io.IOException;
import java.net.InetSocketAddress;
import java.nio.ByteBuffer;
import java.nio.channels.SelectionKey;
import java.nio.channels.Selector;
import java.nio.channels.ServerSocketChannel;
import java.nio.channels.SocketChannel;
import java.util.Iterator;
import java.util.Set;

//Driver class for NIOServer
public class NIOServer {

  //Main method
  public static void main(String[] args) throws IOException {

    // Create a new Selector
    Selector selector = Selector.open();

    // Create a ServerSocketChannel, bind it, and configure it as non-blocking
    ServerSocketChannel serverChannel = ServerSocketChannel.open();
    serverChannel.bind(new InetSocketAddress("localhost", 5454));
    serverChannel.configureBlocking(false);

    // Register the server socket channel with the Selector for accepting connections
    serverChannel.register(selector, SelectionKey.OP_ACCEPT);
    ByteBuffer buffer = ByteBuffer.allocate(256);
    System.out.println("Server started and listening on port 5454...");
    while (true) {

      // Select ready channels using the Selector
      selector.select();

      // Get the set of selected keys
      Set<SelectionKey> selectedKeys = selector.selectedKeys();
      Iterator<SelectionKey> keyIterator = selectedKeys.iterator();

      while (keyIterator.hasNext()) {

        SelectionKey key = keyIterator.next();
        if (key.isAcceptable()) {

          // Accept a new client connection
          ServerSocketChannel server = (ServerSocketChannel) key.channel();
          SocketChannel clientChannel = server.accept();
          clientChannel.configureBlocking(false);

          // Register the client channel with the Selector for reading
          clientChannel.register(selector, SelectionKey.OP_READ);
        }
        if (key.isReadable()) {

          // Read data from the client
          SocketChannel client = (SocketChannel) key.channel();
          buffer.clear();
          int bytesRead = client.read(buffer);
          if (bytesRead == -1) {

            // Client closed the connection
            key.cancel();
            client.close();
            continue;
          }

          buffer.flip();
          String receivedMessage = new String(buffer.array(), 0, bytesRead);

          // Process the received message (e.g., echo it back to the client)
          System.out.println("Received: " + receivedMessage);

          // Prepare the buffer for writing and echo the received message back to the client
          buffer.rewind();
          client.write(buffer);
        }

        // Remove the processed key from the set
        keyIterator.remove();
      }
    }
  }
}
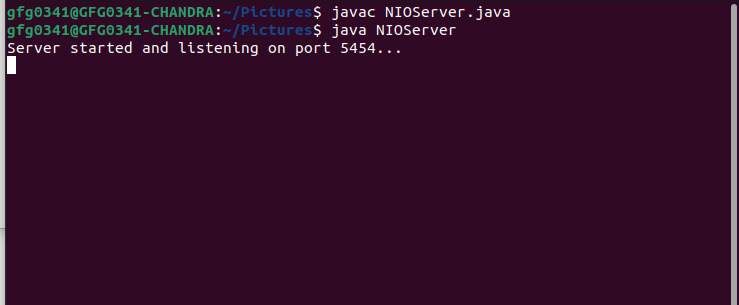
NIO服務器的輸出:

解釋
- 該代碼是 Java NIO 的實現回顯服務器.
- 它使用一個選擇器以實現高效的 I/O 處理。
- 偵聽端口 5454、接受連接並回顯收到的數據。
- 非阻塞 I/O 允許同時處理多個連接。
- 服務器循環監視注冊通道上的事件。
- 接受的連接被注冊以供讀取,並且數據被回顯給客戶端。
創建客戶端:NIOClient.java
在此示例中,我們將使用 SocketChannel 創建一個 NIOClient。
Java
//Java Program to create a
//echo client using NIO Selector

import java.io.IOException;
import java.net.InetSocketAddress;
import java.nio.ByteBuffer;
import java.nio.channels.SocketChannel;


//Driver class for NIOClient
public class NIOClient {

  //Main method
  public static void main(String[] args) throws IOException {

    // Create a socket channel and connect to the server
    SocketChannel clientChannel = SocketChannel.open();
    clientChannel.connect(new InetSocketAddress("localhost", 5454));
    ByteBuffer buffer = ByteBuffer.allocate(256);
    String message = "Hello, NIO Server!";

    // Message to send to the server
    buffer.clear();
    buffer.put(message.getBytes());
    buffer.flip();

    // Send the message to the server
    while (buffer.hasRemaining()) {
      clientChannel.write(buffer);
    }
    buffer.clear();

    // Read the server's response
    clientChannel.read(buffer);
    buffer.flip();

    // Convert the response to a String and print it
    String response = new String(buffer.array(), 0, buffer.limit());
    System.out.println("Server Response: " + response);
    clientChannel.close();
  }
}
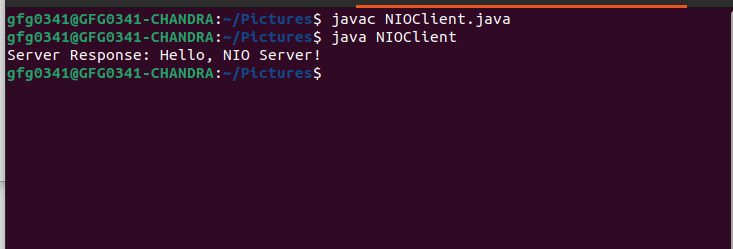
NIO客戶端的輸出:

上述程序的解釋:
- 創建一個
SocketChannel並通過端口 5454 連接到本地主機上的服務器。 - 準備一條消息(“Hello,NIO Server!”)並將其發送到服務器。
- 將服務器的響應讀入緩衝區並將其轉換為字符串。
- 打印服務器的響應。
- 通信後關閉客戶端通道。
結論
java.nio.channels.Selector類是掌握 Java 中非阻塞 I/O 的重要組件。通過了解如何創建選擇器, 與SelectionKey對象,並利用select()方法,我們可以顯著提高 Java 應用程序的效率和響應能力。
相關用法
- Java java.nio.channels.spi.SelectorProvider用法及代碼示例
- Java java.nio.channels.spi.AsynchronousChannelProvider用法及代碼示例
- Java java.nio.charset.CoderResult用法及代碼示例
- Java java.nio.charset.CodingErrorAction用法及代碼示例
- Java java.nio.charset.CharsetEncoder用法及代碼示例
- Java java.nio.charset.Charset用法及代碼示例
- Java java.nio.ByteBuffer用法及代碼示例
- Java java.nio.IntBuffer用法及代碼示例
- Java java.nio.file.FileStore用法及代碼示例
- Java java.nio.FloatBuffer用法及代碼示例
- Java java.nio.file.LinkPermission用法及代碼示例
- Java java.nio.ShortBuffer用法及代碼示例
- Java java.nio.DoubleBuffer用法及代碼示例
- Java java.nio.file.attribute.AclEntry用法及代碼示例
- Java java.nio.LongBuffer用法及代碼示例
- Java java.nio.file.spi.FileTypeDetector用法及代碼示例
- Java java.nio.ByteOrder用法及代碼示例
- Java java.nio.file.attribute.FileTime用法及代碼示例
- Java java.nio.file.SimpleFileVisitor用法及代碼示例
- Java java.nio.file.FileSystems用法及代碼示例
- Java java.nio.CharBuffer用法及代碼示例
- Java java.nio.Buffer用法及代碼示例
- Java java.nio.file.FileSystem用法及代碼示例
- Java java.nio.file.Paths用法及代碼示例
- Java java.net.SocketException用法及代碼示例
注:本文由純淨天空篩選整理自lavkumar5大神的英文原創作品 java.nio.channels.Selector Class in Java。非經特殊聲明,原始代碼版權歸原作者所有,本譯文未經允許或授權,請勿轉載或複製。
