本文簡要介紹python語言中 torch.meshgrid 的用法。
用法:
torch.meshgrid(*tensors, indexing=None)tensors(張量列表) -標量或一維張量列表。標量將自動被視為大小為 的張量
indexing-
(str,可選):索引模式,“xy” 或“ij”,默認為“ij”。請參閱警告以了解未來的變化。
如果選擇“xy”,則第一個維度對應於第二個輸入的基數,第二個維度對應於第一個輸入的基數。
如果選擇“ij”,則維度的順序與輸入的基數相同。
如果輸入具有大小為 的 張量,則輸出也將具有 張量,其中每個張量的形狀為 。
seq(張量序列)
創建由
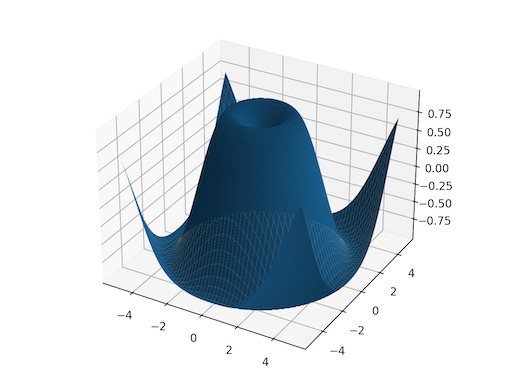
attr:tensors 中的一維輸入指定的坐標網格。當您想要在某個輸入範圍內可視化數據時,這很有幫助。請參閱下麵的繪圖示例。
給定 1D 張量 作為具有相應大小的輸入 ,這將創建 N 維張量 ,每個具有形狀 ,其中輸出 是通過擴展 構造的到結果形狀。
注意
0D 輸入等同於單個元素的 1D 輸入。
警告
torch.meshgrid(*tensors)當前與調用numpy.meshgrid(*arrays, indexing=’ij’)具有相同的行為。將來
torch.meshgrid將轉換為indexing=’xy’作為默認值。https://github.com/pytorch/pytorch/issues/50276 tracks this issue with the goal of migrating to NumPy’s behavior.
例子:
>>> x = torch.tensor([1, 2, 3])
>>> y = torch.tensor([4, 5, 6])

Observe the element-wise pairings across the grid, (1, 4),
(1, 5), ..., (3, 6). This is the same thing as the
cartesian product.
>>> grid_x, grid_y = torch.meshgrid(x, y, indexing='ij')
>>> grid_x
tensor([[1, 1, 1],
        [2, 2, 2],
        [3, 3, 3]])
>>> grid_y
tensor([[4, 5, 6],
        [4, 5, 6],
        [4, 5, 6]])

This correspondence can be seen when these grids are
stacked properly.
>>> torch.equal(torch.cat(tuple(torch.dstack([grid_x, grid_y]))),
...             torch.cartesian_prod(x, y))
True

`torch.meshgrid` is commonly used to produce a grid for
plotting.
>>> import matplotlib.pyplot as plt
>>> xs = torch.linspace(-5, 5, steps=100)
>>> ys = torch.linspace(-5, 5, steps=100)
>>> x, y = torch.meshgrid(xs, ys, indexing='xy')
>>> z = torch.sin(torch.sqrt(x * x + y * y))
>>> ax = plt.axes(projection='3d')
>>> ax.plot_surface(x.numpy(), y.numpy(), z.numpy())
<mpl_toolkits.mplot3d.art3d.Poly3DCollection object at 0x7f8f30d40100>
>>> plt.show()
參數:
返回:
返回類型:
相關用法
- Python PyTorch mean用法及代碼示例
- Python PyTorch median用法及代碼示例
- Python PyTorch monitored_barrier用法及代碼示例
- Python PyTorch multinomial用法及代碼示例
- Python PyTorch matrix_rank用法及代碼示例
- Python PyTorch mm用法及代碼示例
- Python PyTorch mv用法及代碼示例
- Python PyTorch min用法及代碼示例
- Python PyTorch max用法及代碼示例
- Python PyTorch msort用法及代碼示例
- Python PyTorch mode用法及代碼示例
- Python PyTorch movedim用法及代碼示例
- Python PyTorch matrix_exp用法及代碼示例
- Python PyTorch matmul用法及代碼示例
- Python PyTorch matrix_power用法及代碼示例
- Python PyTorch maximum用法及代碼示例
- Python PyTorch masked_select用法及代碼示例
- Python PyTorch maskrcnn_resnet50_fpn用法及代碼示例
- Python PyTorch minimum用法及代碼示例
- Python PyTorch multi_dot用法及代碼示例
- Python PyTorch mul用法及代碼示例
- Python PyTorch movielens_25m用法及代碼示例
- Python PyTorch matrix_norm用法及代碼示例
- Python PyTorch multigammaln用法及代碼示例
- Python PyTorch movielens_20m用法及代碼示例
注:本文由純淨天空篩選整理自pytorch.org大神的英文原創作品 torch.meshgrid。非經特殊聲明,原始代碼版權歸原作者所有,本譯文未經允許或授權,請勿轉載或複製。
