Imagick floodFillPaintImage()函数是PHP中的内置函数,用于更改与目标匹配的任何像素的颜色值,以及与之相邻的相同颜色的像素。
注意:此方法替代不推荐使用的Imagick::paintFloodFillImage()函数,并且如果Imagick是针对ImageMagick 6.3.8或更高版本编译的,则此方法可用。
用法:
bool Imagick::floodFillPaintImage
( mixed $fill, float $fuzz, mixed $target, int $x, int $y, bool $invert
[, int $channel = Imagick::CHANNEL_DEFAULT ] )
参数:从上面的语法中可以看到,该函数具有七个参数。他们是:
- fill (Mixed type):此参数是ImagickPixel对象或包含填充颜色的字符串,使用此函数我们需要在像素上填充该颜色。
- fuzz (Float type):此参数定义模糊的数量。模糊值基于图像颜色的强度。
- target (Mixed type):此参数是ImagickPixel对象或包含要绘制的目标颜色的字符串。
- x (Int type):此参数给出溢流的X坐标开始位置。
- y(Int type):此参数给出溢流口的Y坐标开始位置。
- invert (Mixed type):如果设置为TRUE,则将绘制与目标颜色不匹配的任何像素。简而言之,这是相反的方法(因此反转),以填充除目标颜色以外的其余像素。如果我们只希望填充目标颜色,则默认情况下将其设置为FALSE。
- channel (Int type):此参数用于提供根据我们的要求有效的任何通道常数。如果不需要通道,则无需定义它(只能将函数与上述六个参数一起使用)。
注意:在此处“混合类型”的上下文中,请注意,PHP中的“混合”关键字不是原始类型,因此不能在编程中使用。此处使用混合类型表示该类型可以是任何类型。
返回值:成功时函数返回True。
以下示例说明了PHP中的Imagick::floodFillPaintImage()函数:
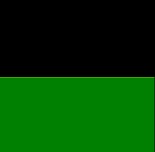
例:让我们考虑两个块,一个黑色和一个绿色(190×90尺寸):


现在,我们将编写一个PHP程序来说明Imagick::floodFillPaintImage()函数。
- 程序:
<?php

 // Create new imagick objects for the blocks under one name:
 $imagick = new Imagick(
'https://media.geeksforgeeks.org/wp-content/uploads/20190720123909/black1.png"
     alt=""
     width="190"
     height="90"
     class="alignnone
     size-full wp-image-1167659');
 $imagick = new Imagick(
 'https://media.geeksforgeeks.org/wp-content/uploads/20190720123923/green3.png"
     alt=""
     width="190"
     height="90"
     class="alignnone
     size-full wp-image-1167665');

 // Append the images into one:
 $imagick->resetIterator();
 $combined = $imagick->appendImages(true);

 // Save the image for comparison:
 $combined->writeImage("blackgreenobjects.png");

 // Set (x, y) values for the target pixel to paint:
 $x = 1;
 $y = 1;

 // Get the color we are painting:
 $target = $combined->getImagePixelColor($x, $y);

 // Paints pixel in position (1, 1) and all neighboring pixels
//that match the target color (black) to green color:
 $combined->floodfillPaintImage("green", 1, $target, $x, $y, false);

 // Save the resulting image:
 $combined->writeImage("greengreenfill.png");

 // Display resulting image:
 echo $combined;

?>
输出:此代码将首先使用一个名称(黑色和绿色块)创建两个Imagick对象,然后将它们附加到其中(连续对象被附加在第一个对象下方)。
- 保存的图像如下所示:
- 然后,使用floodfillPaintImage()函数,将在(x = 1,y = 1)位置的像素及其相邻像素的颜色/填充为绿色。 (1,1)位置的像素被涂成黑色(作为第一个块),因此该像素及其相邻的黑色像素(在链中直到颜色改变为止,填充都像“泛滥”的扩散)充满我们给定的绿色。
保存的图像如下所示:

注意:如果您在目标颜色为绿色的情况下再次使用该函数,则我们最初定义的两个块都将变为填充颜色,因为它们现在都具有相同的颜色。
相关用法
- PHP Imagick readImageFile()用法及代码示例
- PHP Imagick remapImage()用法及代码示例
- PHP Imagick readImage()用法及代码示例
- PHP Imagick distortImage()用法及代码示例
- PHP Imagick extentImage()用法及代码示例
- PHP Imagick readImages()用法及代码示例
- PHP Imagick separateImageChannel()用法及代码示例
- PHP Imagick sepiaToneImage()用法及代码示例
- PHP Imagick convolveImage()用法及代码示例
- PHP Imagick despeckleImage()用法及代码示例
- PHP Imagick setColorspace()用法及代码示例
- PHP Imagick getCopyright()用法及代码示例
- PHP Imagick gaussianBlurImage()用法及代码示例
- PHP Imagick enhanceImage()用法及代码示例
- PHP Imagick encipherImage()用法及代码示例
注:本文由纯净天空筛选整理自Anirban166大神的英文原创作品 PHP | Imagick floodFillPaintImage() Function。非经特殊声明,原始代码版权归原作者所有,本译文未经允许或授权,请勿转载或复制。