1. 先来看看跨域时到底发生了什么?
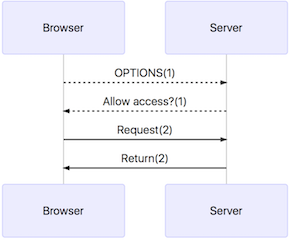
当浏览器端发生js向服务端发送跨域请求时,浏览器会判断是否跨域,如果是跨域请求,则会在发送真实请求前,发送一次OPTIONS(如图(1))预检请求,服务器端会根据预检请求header判断是否满足跨域条件;当服务端预检符合跨域条件,则浏览器(Browser)才会再发送真实的请求(如图(2))至服务器端,请求通过即可正确返回,否则,会返回如下错误:XMLHttpRequest cannot load ‘http://localhost:8080/security/crossDomain’. No ‘Access-Control-Allow-Origin’ header is present on the requested resource. Origin ‘http://localhost:63342’ is therefore not allowed access.
angularjs跨域提交成功,chrome浏览器的请求记录如下图:

从截图可以看出,angularjs发送跨域请求时提交了2次同样的请求,第一次请求为options方法,第二次才是post提交数据的方法。
2. 如何使用spring + angularjs实现跨域POST提交
2.1 服务端Server实现,添加header属性如下
response.addHeader("Access-Control-Allow-Origin", "*");
response.addHeader("Access-Control-Allow-Methods", "POST,GET,OPTIONS,DELETE");
response.addHeader("Access-Control-Allow-Headers", "X-Requested-With,Content-Type");
PS:在SpringMVC框架中,需要将这段代码加入自定义filter中进行全局过滤处理,否则直接放在具体的业务controller可能会无效;另外在自定义interceptor添加这段代码也会无效,原因是跨域第一次OPTIONS预检请求在filter阶段就验证不通过,根据HttpServletRequest执行的顺序(listen->filter->servlet),interceptor类无法拦截OPTIONS请求。
2.2 前端angularjs实现POST跨域提交
var app = angular.module('app', []);
app.factory('requestInterceptor', ['$q', requestInterceptor]);
function HttpInterceptor($q) {
    return {
        request: function(config){
            config.headers = config.headers || {};
            config.headers['Authorization'] = "uShoSR0Oyy1bpgfZ/48VjyrnmjC3ALDv65KN+o+eQ04=";
            return config || $q.when(config);
        }
    };
}
// 全局拦截器,跨域Post数据默认提交格式为application/x-www-form-urlencoded 通过拦截器修改为application/json
app.config(['$httpProvider', function($httpProvider){
    $httpProvider.interceptors.push("requestInterceptor");
    $httpProvider.defaults.headers.post['Content-Type'] = 'application/json';
}]);

app.controller('siteCtrl', function($scope, $http) {
    $http({
        method:'POST',
        url:'http://localhost:8080/security/crossDomain',
        data:{"biz":"biz100010"}
    }).success(function(req){
        console.log(req);
    })
});
2.3 Spring Controller获取POST数据
@RequestMapping("/crossDomain")
@ResponseBody
public String crossDomain(HttpServletRequest request, HttpServletResponse response, @RequestBody String requestBody) {
    System.out.println("requestBody:" +requestBody);
    return "success";
}
用注解@RequestBody的方式获取browser端提交的数据data,在这里使用request.getParameter(“biz”)的值为null.