網格幾何管理器將小部件放置在二維表中。主窗口小部件分為許多行和列,結果表中的每個“cell”可以容納一個窗口小部件。網格管理器是Tkinter中最靈活的幾何管理器。如果您不想學習如何以及何時使用這三位管理者,則至少應確保學習這一點。
考慮以下示例-

使用包管理器創建此布局是可能的,但是它需要大量額外的框架小部件,並且需要做很多工作才能使外觀看起來更好。如果改為使用網格管理器,則每個小部件隻需要調用一次即可正確布置所有內容。
使用網格管理器很容易。隻需創建小部件,然後使用grid方法告訴管理器將它們放置在哪一行和哪一列中即可。您不必預先指定網格的大小;管理器會根據其中的窗口小部件自動確定。
代碼1:
# import tkinter module
from tkinter import * from tkinter.ttk import *

# creating main tkinter window/toplevel
master = Tk()

# this wil create a label widget
l1 = Label(master, text = "First:")
l2 = Label(master, text = "Second:")

# grid method to arrange labels in respective
# rows and columns as specified
l1.grid(row = 0, column = 0, sticky = W, pady = 2)
l2.grid(row = 1, column = 0, sticky = W, pady = 2)

# entry widgets, used to take entry from user
e1 = Entry(master)
e2 = Entry(master)

# this will arrange entry widgets
e1.grid(row = 0, column = 1, pady = 2)
e2.grid(row = 1, column = 1, pady = 2)

# infinite loop which can be terminated by keyboard
# or mouse interrupt
mainloop()
輸出:

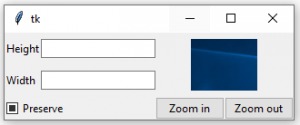
代碼2:創建上麵顯示的布局。
# import tkinter module
from tkinter import * from tkinter.ttk import *

# creating main tkinter window/toplevel
master = Tk()

# this will create a label widget
l1 = Label(master, text = "Height")
l2 = Label(master, text = "Width")

# grid method to arrange labels in respective
# rows and columns as specified
l1.grid(row = 0, column = 0, sticky = W, pady = 2)
l2.grid(row = 1, column = 0, sticky = W, pady = 2)

# entry widgets, used to take entry from user
e1 = Entry(master)
e2 = Entry(master)

# this will arrange entry widgets
e1.grid(row = 0, column = 1, pady = 2)
e2.grid(row = 1, column = 1, pady = 2)

# checkbutton widget
c1 = Checkbutton(master, text = "Preserve")
c1.grid(row = 2, column = 0, sticky = W, columnspan = 2)

# adding image (remember image should be PNG and not JPG)
img = PhotoImage(file = r"C:\Users\Admin\Pictures\capture1.png")
img1 = img.subsample(2, 2)

# setting image with the help of label
Label(master, image = img1).grid(row = 0, column = 2,
       columnspan = 2, rowspan = 2, padx = 5, pady = 5)

# button widget
b1 = Button(master, text = "Zoom in")
b2 = Button(master, text = "Zoom out")

# arranging button widgets
b1.grid(row = 2, column = 2, sticky = E)
b2.grid(row = 2, column = 3, sticky = E)

# infinite loop which can be terminated
# by keyboard or mouse interrupt
mainloop()
輸出:

警告:切勿在同一主窗口中混合使用grid()和pack()。
相關用法
- Python Tkinter destroy()用法及代碼示例
- Python Tkinter pack()用法及代碼示例
- Python Tkinter maxsize()用法及代碼示例
- Python Tkinter place()用法及代碼示例
- Python Tkinter minsize()用法及代碼示例
- Python Tkinter resizable()用法及代碼示例
- Python Tkinter iconphoto()用法及代碼示例
注:本文由純淨天空篩選整理自sanjeev2552大神的英文原創作品 Python | grid() method in Tkinter。非經特殊聲明,原始代碼版權歸原作者所有,本譯文未經允許或授權,請勿轉載或複製。
