Mongoose 查詢API.prototype.exec() 方法Mongoose API 的函數用於查詢對象。它允許我們執行查詢操作來獲取結果數據。使用此方法我們還可以將查詢操作作為參數提供給該方法。讓我們了解一下exec()使用示例的方法。
用法:
query.exec( operation, callback );
Parameters: 該方法接受兩個參數,如下所述:
- operation:它用於指定要使用 exec 方法執行的操作。
- callback: 它用於指定將被調用來處理 Promise 的回調函數。
返回值:此方法返回可以使用回調函數或 then 和 catch 塊處理的 Promise。
設置 Node.js Mongoose 模塊:
步驟1:使用以下命令創建 Node.js 應用程序:
npm init
第2步:創建NodeJS應用程序後,使用以下命令安裝所需的模塊:
npm install mongoose
項目結構:項目結構將如下所示:

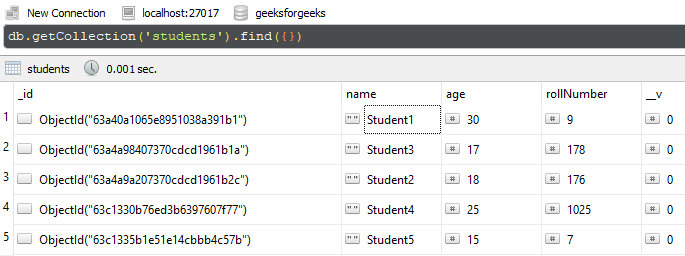
數據庫結構:數據庫結構如下所示,MongoDB 中存在以下數據庫。

示例 1:下麵的示例說明了 Mongoose Connection 的基本函數exec()方法。我們隻是執行find()方法結果使用此方法並處理返回的承諾exec()方法通過提供回調函數。
文件名:app.js
Javascript
// Require mongoose module
const mongoose = require("mongoose");
// Set Up the Database connection
const URI = "mongodb://localhost:27017/geeksforgeeks";
const connectionObject = mongoose.createConnection(URI, {
    useNewUrlParser: true,
    useUnifiedTopology: true,
});
const studentSchema = new mongoose.Schema({
    name: { type: String, required: true },
    age: Number,
    rollNumber: { type: Number, required: true }
});
const StudentModel = connectionObject.model('Student', studentSchema);
StudentModel.find().exec((error, result) => {
    if (error) {
        console.log(error);
    } else {
        console.log(result);
    }
})運行程序步驟:要運行應用程序,請從項目的根目錄執行以下命令:
node app.js
輸出:
[
  {
    _id: new ObjectId("63a40a1065e8951038a391b1"),
    name: 'Student1',
    age: 30,
    rollNumber: 9,
    __v: 0
  },
  {
    _id: new ObjectId("63a4a98407370cdcd1961b1a"),
    name: 'Student3',
    age: 17,
    rollNumber: 178,
    __v: 0
  },
  {
    _id: new ObjectId("63a4a9a207370cdcd1961b2c"),
    name: 'Student2',
    age: 18,
    rollNumber: 176,
    __v: 0
  },
  {
    _id: new ObjectId("63c1330b76ed3b6397607f77"),
    name: 'Student4',
    age: 25,
    rollNumber: 1025,
    __v: 0
  },
  {
    _id: new ObjectId("63c1335b1e51e14cbbb4c57b"),
    name: 'Student5',
    age: 15,
    rollNumber: 7,
    __v: 0
  }
]
示例 2:下麵的示例說明了 Mongoose Connection 的基本函數exec()方法。在此示例中,我們通過向文檔提供操作名稱和回調函數來更新集合中的文檔之一exec()方法。
文件名:app.js
Javascript
// Require mongoose module
const mongoose = require("mongoose");
// Set Up the Database connection
const URI = "mongodb://localhost:27017/geeksforgeeks";
const connectionObject = mongoose.createConnection(URI, {
    useNewUrlParser: true,
    useUnifiedTopology: true,
});
const studentSchema = new mongoose.Schema({
    name: { type: String, required: true },
    age: Number,
    rollNumber: { type: Number, required: true }
});
const StudentModel = connectionObject.model('Student', studentSchema);
const query = StudentModel.update(
    { name: "Student1" }, { age: 20 }
);
query.exec('update', (error, result) => {
    if (error) {
        console.log(error);
    } else {
        console.log(result);
    }
})運行程序步驟:要運行應用程序,請從項目的根目錄執行以下命令:
node app.js
輸出:
{
  acknowledged: true,
  modifiedCount: 1,
  upsertedId: null,
  upsertedCount: 0,
  matchedCount: 1
}
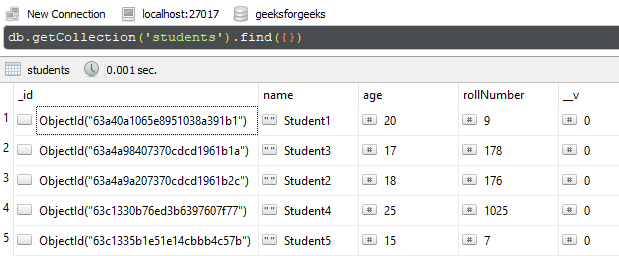
使用 Robo3T GUI 工具的數據庫的 GUI 表示:

注意:最新版本7發布後,mongoose取消了.exec()中對回調的支持,現在我們可以使用promise的.then、.catch或async-await的try-catch。
這是在 .then 和 .catch 的幫助下更新的示例 1
Javascript
StudentModel.find().exec()
  .then(result => {
    console.log(result);
  })
  .catch(error => {
    console.log(error);
  });
相關用法
- Mongoose Query.prototype.exec()用法及代碼示例
- Mongoose Query.prototype.explain()用法及代碼示例
- Mongoose Query.prototype.exists()用法及代碼示例
- Mongoose Query.prototype.error()用法及代碼示例
- Mongoose Query.prototype.elemMatch()用法及代碼示例
- Mongoose Query.prototype.equals()用法及代碼示例
- Mongoose Query.prototype.estimatedDocumentCount()用法及代碼示例
- Mongoose Query.prototype.all()用法及代碼示例
- Mongoose Query.prototype.and()用法及代碼示例
- Mongoose Query.prototype.batchSize()用法及代碼示例
- Mongoose Query.prototype.box()用法及代碼示例
- Mongoose Query.prototype.catch()用法及代碼示例
- Mongoose Query.prototype.centerSphere()用法及代碼示例
- Mongoose Query.prototype.circle()用法及代碼示例
- Mongoose Query.prototype.collation()用法及代碼示例
- Mongoose Query.prototype.cursor()用法及代碼示例
- Mongoose Query.prototype.distinct()用法及代碼示例
- Mongoose Query.prototype.geometry()用法及代碼示例
- Mongoose Query.prototype.getOptions()用法及代碼示例
- Mongoose Query.prototype.getPopulatedPaths()用法及代碼示例
- Mongoose Query.prototype.getUpdate()用法及代碼示例
- Mongoose Query.prototype.gt()用法及代碼示例
- Mongoose Query.prototype.gte()用法及代碼示例
- Mongoose Query.prototype.hint()用法及代碼示例
- Mongoose Query.prototype.lean()用法及代碼示例
注:本文由純淨天空篩選整理自sakshio0hoj大神的英文原創作品 Mongoose Query.prototype.exec() API。非經特殊聲明,原始代碼版權歸原作者所有,本譯文未經允許或授權,請勿轉載或複製。
