appJar 庫旨在提供使用 Python 創建 GUI 的最簡單方法。它是 Tkinter 的包裝,允許中學生用 Python 開發簡單的 GUI。 appJar 的設計方式使其可以在許多版本的 Python 上運行,因此初學者非常容易使用。
安裝
appJar 庫主要設計用於學校,因此不需要特定安裝。
任何 Python 程序員都可以下載zip 文件,將其解壓並複製到源代碼文件夾中後使用該庫。
它還支持使用以下命令進行安裝:
pip install appjar
入門
要創建 appJar 應用程序:
- 從 appJar 庫導入 gui 並創建 gui 變量。
為此,在源代碼文件的開頭添加以下行# import the library from appJar import gui # let app be name of gui variable app = gui()
- 使用 app 變量,配置每個小部件的應用程序外觀和邏輯。
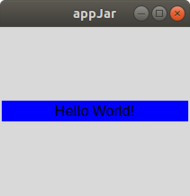
例如,這裏我們使用 app 變量創建一個顯示 “Hello World” 的窗口。app.addLabel("title", " Hello World! ") app.setLabelBg("title", "blue") - 最後,通過在代碼中附加以下命令來運行應用程序:
app.go()
完整代碼:
# Python program to demonstrate
# hello world in appjar


# import the library
from appJar import gui

# let app be name of gui
# variable
app = gui()

# Adding the label
app.addLabel("title", " Hello World! ")

# Setting the background color
app.setLabelBg("title", "blue")
app.go()
輸出:
小部件
有兩種類型的小部件:輸入小部件和輸出小部件。 Widget 通常具有三個常見函數:
- add -該函數用於將小部件添加到應用程序中
- get -該函數用於獲取widget的內容
- set -該函數用於更改內容或配置小部件
對於上述每個函數,第一個參數始終是小部件的標題。下麵提到了一些常用的小部件。
輸入小部件
它們用於記錄用戶通過單擊、拖動或鍵入與應用程序的交互。
- Entry:該小部件用於獲取用戶的鍵入輸入,通常該小部件采用單個參數 - 標題
用法:
app.addEntry("entryTitle")您可以使用以下方法將默認值設置為條目:
app.setEntryDefault("entryTitle", "defaultText")要獲取特定條目的值,請使用:
app.getEntry("entryTitle")要獲取所有條目的值,請使用。
app.getAllEntries()
注意:這將以字典的形式返回所有條目的內容。
例子:
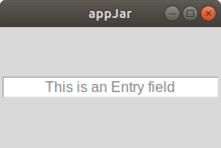
# Python program to demonstrate
# entry widget appjar


from appJar import gui

app = gui()

# Adding the entry
app.addEntry("entry_1")

# Setting the default value
app.setEntryDefault("entry_1",
                    "This is an Entry field")

app.go()
輸出:
- TextArea:該小部件用於獲取用戶鍵入的輸入,但與輸入字段不同,它支持多行鍵入文本。
用法:
app.addTextArea("textAreaTitle", text=None)您可以使用以下方法將文本添加到指定的文本區域:
app.setTextArea("textAreaTitle", "someText", end = True, callFunction = True)- 默認情況下,通過在參數中設置 end = False 在文本區域的末尾添加文本,您可以在文本區域的開頭附加文本
- 如果您不想調用任何關聯函數,則將 callFunction 設置為 False
要獲取特定文本區域的值,請使用:
app.getTextArea("textAreaTitle")要獲取所有文本區域的內容,請使用。
app.getAllTextAreas()
注意:這將以字典的形式返回所有條目的內容。
示例
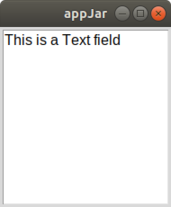
# Python program to demonstrate
# textarea widget appjar


from appJar import gui


app = gui()

# Adding text area
app.addTextArea("TA_1")

# Setting the default value
app.setTextArea("TA_1",
                "This is a Text field",
                end = True, callFunction = False)

app.go()
輸出:
- Button:按鈕用於調用特定函數,使應用程序與用戶更具交互性。
用法:
app.addButton("buttonTitle", functionName )這裏,應該指定 functionName,當單擊按鈕時將調用該函數,其中標題作為參數傳遞給被調用的函數。
您可以使用以下命令更改按鈕的名稱,但不能更改作為參數傳遞的值:
app.setButton("buttonTitle", "someText")您還可以使用以下方法在按鈕上放置圖像而不是文本:
app.setButtonImage("buttonTitle", "imagePath", align=None)如果設置了對齊,則圖像將相對於文本對齊,否則圖像將簡單地替換文本。
例子:
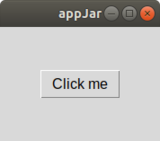
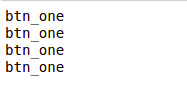
# Python program to demonstrate
# button widget of appjar


from appJar import gui


# Function to be passed
# when the button is clicked
def clicked(btn):
    print(btn)

app = gui()

# Adding the button
app.addButton("btn_one", clicked)

# Change the name of the button
app.setButton("btn_one", "Click me")

app.go()
輸出:
單擊按鈕後:
輸出小部件
這些小部件用於向與應用程序交互的用戶顯示一些信息。
- Label:標簽用於在應用程序上顯示文本。
用法:
app.addLabel("labelTitle", text="someText")在這裏,如果文本設置為“無”,則標簽的標題將顯示在應用程序的標簽輸出小部件中。
您可以使用以下方法更改標簽的內容:
app.setLabel("labelTitle", "someText")您可以使用以下方法獲取標簽的內容:
app.getLabel("labelTitle")例子:
# Python program to demonstrate
# label widget of appjar


from appJar import gui

app = gui()

# Adding the label
app.addLabel("label_1",
             text ="This is a label")

app.go()
輸出:

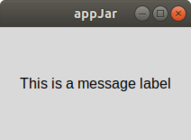
- Message:消息小部件用於在應用程序上顯示多行文本。
用法:
app.addMessage("messageTitle", text="someText")在這裏,如果文本設置為“無”,則消息小部件的標題將顯示在應用程序的消息輸出小部件中。
您可以使用以下方法更改消息的內容:
app.setMessage("messageTitle", "someText")您可以使用以下方法清除指定消息小部件的內容:
app.clearMessage("messageTitle")示例
# Python program to demonstrate
# message widget of appjar


from appJar import gui


app = gui()

# Adding the message label
app.addLabel("label_1",
             text ="This is a message label")

app.go()
輸出:
相關用法
- Python Ascii()用法及代碼示例
- Python ASCII轉Binary用法及代碼示例
- Python ArcGIS UX.featured_content用法及代碼示例
- Python ArcGIS PortalLicense.update用法及代碼示例
- Python arcgis.mapping.SceneLayerManager.delete_tiles用法及代碼示例
- Python arcgis.mapping.SceneLayerManager.edit_tile_service用法及代碼示例
- Python arcgis.mapping.SceneLayerManager.import_tiles用法及代碼示例
- Python arcgis.mapping.SceneLayerManager.update_tiles用法及代碼示例
- Python arcgis.mapping.MapImageLayerManager.import_tiles用法及代碼示例
- Python arcgis.apps.hub.Initiative.delete用法及代碼示例
- Python arcgis.apps.hub.Initiative.update用法及代碼示例
- Python arcgis.apps.hub.Indicator.delete用法及代碼示例
- Python arcgis.apps.hub.Indicator.update用法及代碼示例
- Python arcgis.apps.hub.InitiativeManager.add用法及代碼示例
- Python arcgis.apps.hub.InitiativeManager.get用法及代碼示例
- Python arcgis.apps.hub.IndicatorManager.add用法及代碼示例
- Python arcgis.learn.export_training_data用法及代碼示例
- Python arcgis.learn.detect_objects用法及代碼示例
- Python arcgis.learn.classify_objects用法及代碼示例
- Python arcgis.learn.classify_pixels用法及代碼示例
- Python arcgis.learn.list_models用法及代碼示例
- Python arcgis.learn.train_model用法及代碼示例
- Python ArcGIS GIS.map用法及代碼示例
- Python ArcGIS GIS.update_properties用法及代碼示例
- Python ArcGIS GIS用法及代碼示例
注:本文由純淨天空篩選整理自Meet Parekh大神的英文原創作品 AppJar module in Python。非經特殊聲明,原始代碼版權歸原作者所有,本譯文未經允許或授權,請勿轉載或複製。