OroCRM是一個基於Symfony2的框架,用PHP編程語言開發的靈活的開源客戶關係管理(CRM)平台。 OroCRM可由多渠道電子商務市場團隊使用,它能夠管理客戶和聯係信息,並跟蹤市場營銷活動的績效。 OroCRM還可以輕鬆地與流行的電商平台集成,例如Magento,MailChimp或Zendesk。 OroCRM通常部署在Linux下的Apache /Nginx Web服務器,PHP和MySQL /MariaDB數據庫下,也稱為LAMP或LEMP技術棧。
本教程向您展示如何在Debian 9上安裝和配置最新版本的OroCRM。
要求
- 在虛擬專用服務器或裸機上安裝Debian 9輕量級服務器。(注:裸機是指無操作係統的計算機)
- 服務器應至少具有2GB的RAM。
- 服務器上的root訪問權限。
- 服務器應具有手動配置或使用DHCP的靜態IP地址。
- 指向服務器的域名或子域名。
- 郵件服務器或可以對公用郵件服務器服務進行訪問,例如“Gmail”,“Yahoo!”,“Outlook”。
準備服務器
在第一步中,使用root帳戶或具有root用戶權限的帳戶登錄到服務器控製台。
配置主機名
通過執行以下命令來配置您的計算機主機名。您應該用自己的域名替換本示例(www.mycrm.com)中使用的主機名變量。
hostnamectl set-hostname www.mycrm.com更改計算機名稱後,通過執行以下命令來驗證計算機主機名。請注意,目前機器主機名處於臨時狀態,並不會立即生效。重新啟動計算機後,它才會實際應用。
host –s
host –f
安裝Debian更新
在重啟機器之前,請確保Debian係統版本是最新的,其中包含最新的軟件更新,安全補丁和新的內核。運行以下命令以安裝更新。
apt update
apt upgrage
更新過程完成後,您需要通過執行以下命令來重啟Debian服務器,以應用內核更新和主機名更改。
systemctl reboot安裝LAMP棧
在接下來的步驟中,我們將在Debian 9中安裝LAMP軟件包。OroCrm平台主要是用PHP 服務器端編程語言開發的,因此我們將必須安裝PHP解釋器和Apache HTTP服務器。使用以下命令安裝Apache和PHP:
apt install apache2 libapache2-mod-php7.0 php7.0 php7.0-gd php7.0-opcache php7.0-json php7.0-mbstring php7.0-xml php7.0-mcrypt php7.0-cli php7.0- curl php7.0-zip php7.0-intl php7.0-soap php7.0-tidy如果要檢查所有已安裝的PHP模塊是否處於活動狀態,請執行以下命令。
php –m
為了存儲不同的配置,例如用戶,會話,聯係人和其他數據,OroCRM需要一個關係數據庫作為後端。在本指南中,我們將使用MariaDB數據庫部署OroCRM。為了安裝MariaDB和用於訪問MariaDB數據庫的PHP模塊,請在服務器控製台中執行以下命令。
apt install mariadb-server php7.0-mysql mariadb-client
如果您無法使用公共郵件服務器連接OroCRM,則應通過執行以下命令在係統上安裝Postfix MTA服務器。
apt install postfix下一步,通過執行以下命令,確保在係統中安裝Node.js javascript引擎。 OroCRM需要Node.js。
apt-get install nodejs在此步驟中,我們將調整一些PHP設置。首先,備份php.ini文件。
cp /etc/php/7.0/apache2/php.ini{,.backup}【注:上述命令等價於:cp /etc/php/7.0/apache2/php.ini, cp /etc/php/7.0/apache2/php.ini.backup】
然後使用文本編輯器打開/etc/php/7.0/apache2/php.ini,並按如下方式更改行。另外再次強調,務必先請備份PHP配置文件。
nano /etc/php/7.0/apache2/php.ini【注:nano是超簡單的Linux文本編輯器。當然,這裏用其他的編輯器也可以。】
在php.ini文件中搜索,編輯和更改以下變量:
file_uploads = On
default_charset = UTF-8
memory_limit = 512M
date.timezone = Europe/London>要支持大文件附件,您應該搜索並增加upload_max_file_size和post_max_filesize,根據您自己的要求設置變量值。您還應確保date.timezone變量配置為與服務器的物理位置匹配。可以通過在以下鏈接中查詢PHP文檔提供的時區列表來找到PHP時區列表。
http://php.net/manual/en/timezones.php
保存php.ini文件。
接下來,啟用PHP 7的OPCache插件,以提高OroCRM的加載速度。在文件底部[opcache]聲明的下方添加或更改以下行,如下所示:
nano /etc/php/7.0/apache2/conf.d/10-opcache.ini[opcache]
opcache.enable=1
opcache.enable_cli=1
opcache.interned_strings_buffer=8
opcache.max_accelerated_files=11000
opcache.memory_consumption=256
opcache.fast_shutdown=1
opcache.load_comments=1
opcache.save_comments=1保存並關閉文件。為了應用到目前為止所做的所有更改,請通過執行以下命令來重新啟動Apache服務。
systemctl restart apache2接下來,通過執行以下命令為Apache啟用重寫模塊。需要通過重寫模塊通過服務器Webroot路徑中的.htaccess文件來修改Apache運行時環境。
a2enmod rewrite
 systemctl restart apache2
為了通過HTTPS協議安全地安裝和訪問OroCRM,請通過執行以下命令來啟用SSL模塊和SSL站點配置文件。
a2enmod ssl
a2ensite default-ssl.conf使用文本編輯器打開Apache默認的SSL站點配置文件,並在DocumentRoot指令後麵添加以下代碼行來啟用URL重寫規則,如以下示例所示。確保將webroot路徑更改為在/var/www/html/web
nano /etc/apache2/sites-enabled/default-ssl.confSSL站點配置文件摘錄:
DocumentRoot /var/www/html/web
<Directory /var/www/html/web>
  Options +FollowSymlinks
  AllowOverride All
  Require all granted
</Directory>
然後打開/etc/apache2/sites-enabled/000-default.conf文件進行編輯,並添加與SSL配置文件相同的URL重寫規則。在DocumentRoot語句後麵插入如下例所示的代碼行。另外,將DocumentRoot路徑更改為在/var /www /html/web
DocumentRoot /var/www/html/web
<Directory /var/www/html/web>
  Options +FollowSymlinks
  AllowOverride All
  Require all granted
</Directory>最後,創建/var /www/html/web目錄並重新啟動Apache守護程序,以應用到目前為止的所有更改。
mkdir -p /var/www/html/web
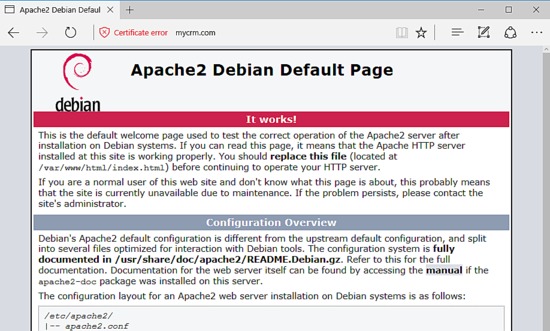
systemctl restart apache2通過HTTP協議訪問您的域名或服務器IP地址。由於您使用的是自動生成的Self-Signed證書,因此瀏覽器中將顯示警告。忽略警告以接受不受信任的證書,您將被重定向到Apache默認網頁,如下圖所示。
HTTPS://yourdomain.tld
在Debian係統上啟用防火牆(例如UFW防火牆)後,您可能無法訪問Apache Web服務器。確保添加新規則以允許HTTP和HTTPS通信能通過防火牆。以下命令用於UFW防火牆:
ufw allow  http
ufw allow https如果您使用iptables管理Debian服務器上防火牆的原始規則,那麽添加以下規則以,允許防火牆上的端口80和443的入站通信,以便客戶端可以瀏覽OroCrm應用程序。保存iptables規則,然後重新啟動並啟用該服務。
apt-get install -y iptables-persistent

iptables -I INPUT -p tcp –destination-port 80 -j ACCEPT
iptables -I INPUT -p tcp –destination-port 443 -j ACCEPT

netfilter-persistent  save

systemctl restart netfilter-persistent
systemctl status netfilter-persistent
systemctl enable netfilter-persistent.service
最後,通過執行以下命令,在您的應用程序webroot路徑中創建一個PHP信息文件。
echo '<?php phpinfo();?>' | tee /var/www/html/web/info.php通過HTTPS協議用以下URL上從瀏覽器訪問PHP信息腳本文件,並檢查PHP服務器環境配置。向下滾動到日期設置以檢查PHP時區配置。
下一步,通過登錄數據庫控製台並向空白root帳戶插件發出以下命令, 以保護MariaDB root帳戶。請注意,MariaDB根(root)帳戶與Linux係統根帳戶不同。這些根帳戶是兩個不同的帳戶。 Linux超級用戶用於管理係統,MySQL超級用戶用於管理MariaDB數據庫。
mysql -h localhostWelcome to the MariaDB monitor. Commands end with ; or \g.
Your MariaDB connection id is 2
Server version: 10.1.26-MariaDB-0+deb9u1 Debian 9.1
Copyright (c) 2000, 2017, Oracle, MariaDB Corporation Ab and others.
Type ‘help;’ or ‘\h’ for help. Type ‘\c’ to clear the current input statement.
MariaDB [(none)]> use mysql;Reading table information for completion of table and column names
You can turn off this feature to get a quicker startup with -A
Database changed
MariaDB [mysql]> update user set plugin=” where user=’root’;Query OK, 1 row affected (0.00 sec)
Rows matched: 1 Changed: 1 Warnings: 0
MariaDB [mysql]> flush privileges;Query OK, 0 rows affected (0.00 sec)
MariaDB [mysql]> exitBye
通過執行腳本mysql_secure_installation進一步保護MariaDB。該腳本將詢問一係列旨在保護MariaDB數據庫的問題,例如:更改MySQL根密碼,刪除匿名用戶,禁用遠程root登錄並刪除測試數據庫。確保您對所有問題回答是,並為數據庫根帳戶提供一個強密碼,以完全保護MySQL守護程序,如下麵的腳本輸出摘錄所示。
mysql_secure_installation
NOTE: RUNNING ALL PARTS OF THIS SCRIPT IS RECOMMENDED FOR ALL MariaDB
SERVERS IN PRODUCTION USE! PLEASE READ EACH STEP CAREFULLY!
In order to log into MariaDB to secure it, we’ll need the current
password for the root user. If you’ve just installed MariaDB, and
you haven’t set the root password yet, the password will be blank,
so you should just press enter here.
Enter current password for root (enter for none):
OK, successfully used password, moving on…
Setting the root password ensures that nobody can log into the MariaDB
root user without the proper authorisation.
You already have a root password set, so you can safely answer ‘n’.
Change the root password? [Y/n] y
New password:
Re-enter new password:
Password updated successfully!
Reloading privilege tables..
… Success!
By default, a MariaDB installation has an anonymous user, allowing anyone
to log into MariaDB without having to have a user account created for
them. This is intended only for testing, and to make the installation
go a bit smoother. You should remove them before moving into a
production environment.
Remove anonymous users? [Y/n] y
… Success!
Normally, root should only be allowed to connect from ‘localhost’. This
ensures that someone cannot guess at the root password from the network.
Disallow root login remotely? [Y/n] y
… Success!
By default, MariaDB comes with a database named ‘test’ that anyone can
access. This is also intended only for testing, and should be removed
before moving into a production environment.
Remove test database and access to it? [Y/n] y
– Dropping test database…
… Success!
– Removing privileges on test database…
… Success!
Reloading the privilege tables will ensure that all changes made so far
will take effect immediately.
Reload privilege tables now? [Y/n] y
… Success!
Cleaning up…
All done! If you’ve completed all of the above steps, your MariaDB
installation should now be secure.
Thanks for using MariaDB!
為了測試MariaDB安全性,請嘗試通過控製台登錄數據庫,而不要輸入root帳戶密碼。如果沒有為根帳戶提供密碼,則應拒絕對數據庫的訪問,如以下命令摘錄所示:
mysql -h localhost -u rootERROR 1045 (28000): Access denied for user ‘root’@’localhost’ (using password: NO)
如果提供了密碼,則應該授予登錄過程,並且您應該能夠登錄到MySQL控製台,如以下命令示例所示。鍵入退出為了離開數據庫。
mysql -h localhost -u root -pEnter password:
Welcome to the MariaDB monitor. Commands end with ; or \g.
Your MariaDB connection id is 15
Server version: 10.1.26-MariaDB-0+deb9u1 Debian 9.1
Copyright (c) 2000, 2017, Oracle, MariaDB Corporation Ab and others.
Type ‘help;’ or ‘\h’ for help. Type ‘\c’ to clear the current input statement.
MariaDB [(none)]> exit
Bye
安裝OroCRM
在實際開始安裝OroCRM之前,我們將安裝一些實用程序,從Internet下載文件並解壓縮zip存檔。
apt install wget zip unzip curl訪問GitHub上的OroCRM下載頁麵並獲取最新的zip存檔。我將在此處使用OroCRM 2.6。在wget命令,下載OroCRM:
cd /tmp
wget https://github.com/oroinc/crm-application/archive/2.6.0.zip
壓縮文件下載完成後,將歸檔文件提取到當前工作目錄中,並通過以下命令列出提取的文件。另外,將Apache Web服務器安裝到webroot路徑的默認index.html文件刪除,並刪除之前創建的info.php文件。
解壓縮zip歸檔文件:
unzip 2.6.0.zip列出解壓縮的文件:
ls
刪除默認的索引文件和info.php文件。
rm /var/www/html/index.html
rm /var/www/html/web/info.phpOroCRM的安裝文件位於您當前的工作目錄中,也就是crm-application-2.6.0/的子目錄。通過執行以下命令,將子目錄中的文件和文件夾複製到Web服務器文檔的根路徑。
cp -rf crm-application-2.6.0 /* /var /www /html/接下來,轉到webroot路徑,並通過執行以下命令為PHP安裝Composer依賴性管理器。
cd /var/www/html/
curl -sS https://getcomposer.org/installer | PHPAll settings correct for using Composer
Downloading…
….
Composer (version 1.5.5) successfully installed to: /var/www/html/composer.phar
Use it: php composer.phar
在服務器上安裝Composer之後,通過執行以下命令,通過Composer腳本安裝OroCRM依賴項。
php7.0 composer.phar install –prefer-dist –no-dev該腳本將要求輸入應用程序的配置參數,以引導OroCRM。隻需按[enter]鍵繼續即可(使用默認值)。
接下來,通過執行以下命令,確保將Composer $ HOME路徑行插入.htaccess托管應用程序的Web目錄中。
echo ‘SetEnv COMPOSER_HOME “/var/www/html” ‘ >> /var/www/html/web/.htaccess
現在執行以下命令,以向Apache運行時用戶授予對應用程序Web、應用程序、緩存目錄的完全寫權限。
chown -R www-data:www-data /var /www /html /web /
chown -R www-data:www-data /var /www /html /app /
chown -R www-data:www-data /var /www /html /cache /
該應用程序的配置文件是parameters.yml,在/var /www /html/app/config/路徑下。
登錄到MariaDB數據庫控製台,並為oroCRM和具有密碼的用戶創建一個數據庫來管理OroCRM數據庫。相應地替換數據庫名稱,用戶和密碼。
mysql –u root -pWelcome to the MariaDB monitor. Commands end with ; or \g.
Your MariaDB connection id is 2
Server version: 10.1.26-MariaDB-0+deb9u1 Debian 9.1
Copyright (c) 2000, 2017, Oracle, MariaDB Corporation Ab and others.
Type ‘help;’ or ‘\h’ for help. Type ‘\c’ to clear the current input statement.
MariaDB [(none)]> create database mycrm_db;
Query OK, 1 row affected (0.00 sec)
MariaDB [(none)]> grant all privileges on mycrm_db.* to ‘crm_user’@’localhost’ identified by ‘password1234’;
Query OK, 0 rows affected (0.00 sec)
MariaDB [(none)]> flush privileges;
Query OK, 0 rows affected (0.00 sec)
MariaDB [(none)]> exit
Bye
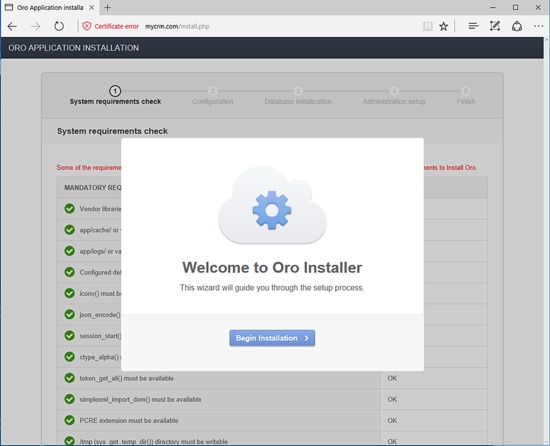
現在,讓我們通過網絡界麵開始OroCRM安裝過程。打開瀏覽器,然後通過HTTPS協議導航到您的域名或服務器IP地址。
在第一個安裝屏幕上,OroCRM安裝程序向導將顯示一個歡迎屏幕。點擊開始安裝 按鈕以啟動設置過程。
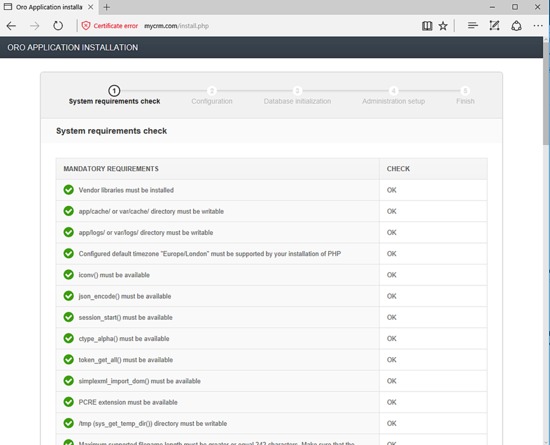
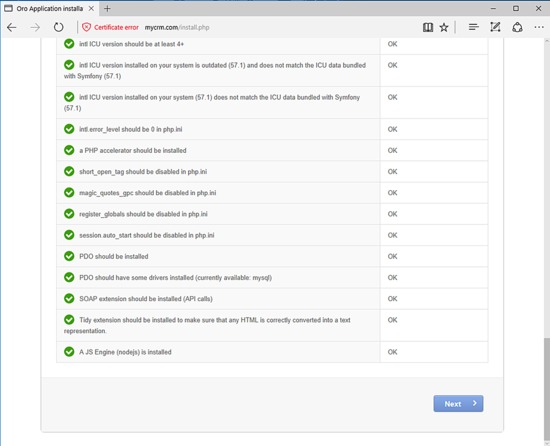
在下一個屏幕上,安裝程序將檢查您的係統要求。如果通過了所有係統和PHP要求,如下圖所示,請單擊“下一步”按鈕轉到下一步。
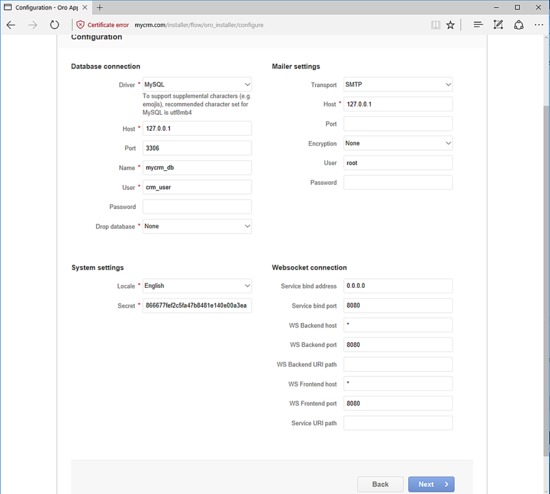
在下一個屏幕上,添加數據庫連接設置。選擇MySQL驅動程序,為數據庫主機輸入127.0.0.1,為MySQL端口輸入3306,然後添加先前配置的數據庫名稱,用戶和密碼設置。為“刪除數據庫”選項選擇“無”。
然後,轉到Mailer設置並添加您自己的郵件服務器SMTP配置。如果在同一節點上運行本地郵件服務器,請在SMTP服務器主機字段中添加127.0.0.1。
然後,轉到“係統設置”,為OroCRM選擇“語言環境”設置,並將“Secret”保留為應用程序安裝程序生成的默認密鑰。最後,將WebSocket連接保留為默認設置,然後單擊“下一步”按鈕繼續安裝過程。
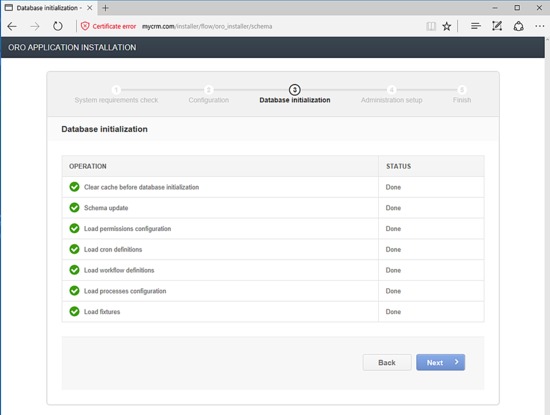
在下一個屏幕上,等待MySQL數據庫架構初始化,然後單擊下一個按鈕移至下一步。
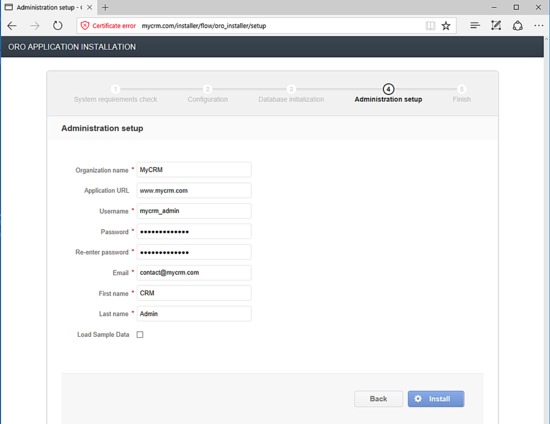
接下來,在OroCRM組織名稱中設置一個名稱,提供您的應用程序URL地址和具有強密碼的管理員帳戶。另外,添加管理員帳戶的電子郵件地址以及管理員帳戶的名字和姓氏。最後,取消選中加載樣品數據,並點擊“安裝”按鈕以開始OroCRM安裝過程。
等待安裝過程完成並繼續下一個按鈕以完成安裝過程,並移至最後一個向導屏幕。

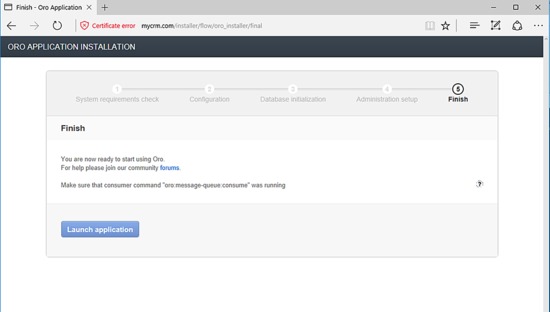
安裝過程完成後,安裝程序將顯示最終安裝屏幕,並通知您安裝過程已完成。在這裏,隻需單擊啟動應用程序按鈕即可重定向到OroCRM登錄屏幕。
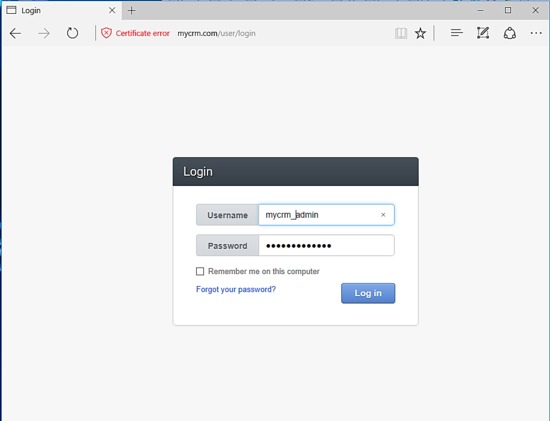
為了登錄到OroCRM平台,請在安裝過程中使用為admin帳戶配置的憑據,如以下屏幕截圖所示。
您將被重定向到OroCRM默認儀表板,如下圖所示。現在,您可以開始管理您的CRM平台了。

最後,為了迫使訪問者通過HTTPS協議安全地訪問CRM應用,請返回服務器的終端並通過發出以下命令編輯OroCRM的.htaccess,將其放置在您的網站文檔根路徑中的文件。
nano /var/www/html/web/.htaccess
在這裏,在RewriteEgine On下麵添加以下行自動將應用程序客戶端重定向到HTTPS。
# Redirect to HTTPS
RewriteCond %{HTTPS} off
RewriteRule (.*) https://%{SERVER_NAME}/$1 [R,L]
您還可以在.htaccess文件的末尾添加一些新行,以修改本機PHP服務器設置on-fly,例如文件上傳大小。確保下麵顯示的PHP設置與您自己的服務器資源匹配。
# PHP settings alteration
php_value upload_max_filesize 100M
php_value post_max_size 100M
為了自動執行OroCRM管理任務,請添加以下cron作業擁有的Apache運行時用戶。
crontab –u www-data –ecrontab文件摘錄:
*/5 * * * * /usr/bin/php7.0 /var/www/html/app/console oro:cron --env=prod > /dev/null
# Run maintenance tasks by executing MessageQueueComponent and MessageQueueBundle asynchronously.
*/5 * * * * /usr/bin/php7.0 /var/www/html/app/console oro:message-queue:consume --env=prod > /dev/null
恭喜! OroCRM平台已成功部署在您的Debian 9服務器上。請在以下地址查閱OroCRM文檔頁麵:https://oroinc.com/orocrm/doc/current,為了進一步配置您的CRM平台。